|
with Mike Mac HANDLING
TECHNIQUES AND EQUIPMENT:
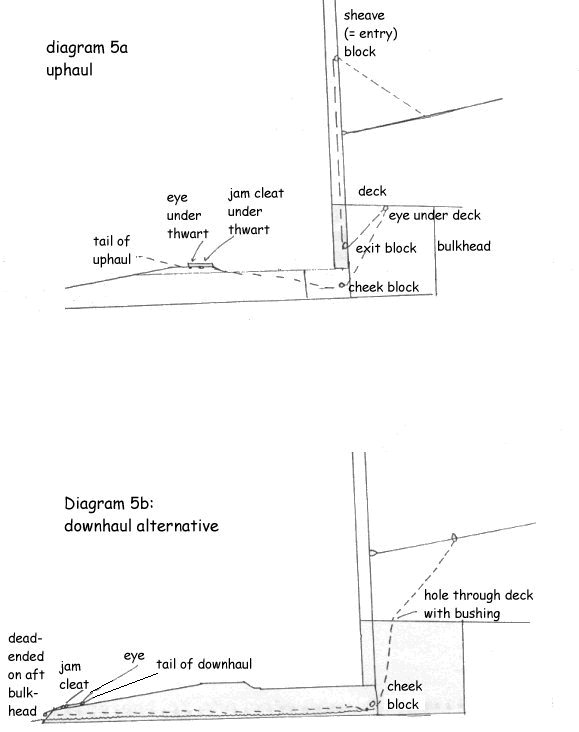
To get the spinnaker as flat as possible, it is necessary to organize the sheeting and pole position. The spinnaker needs to be hoisted as high as possible. Do not tie a knot in the halliard just above the head to keep the head away from the mast. A knot could also jam in the halliard exit sheave. Incidentally, the pole should always be clipped on to the mast eye with the piston part uppermost. This means that the crew doesnt have to lift the pole up and over when setting, or up and out when lowering. It also means that the spinnaker sheet is running over the solid part at the outer end, and not the piston. The spinnaker pole uphaul has to control the height of the pole and needs to be adjustable. There are various ways of attaching it to the pole. The most suitable depends upon where the pole is stowed when not in use. If it is stowed on the boom, then a keyring or loop system is best. If a key ring is used, then stopper blocks should be mounted on the sides of the pole on either side of the centreline, so that has only to be twisted through 90º. (Fig. 2a) 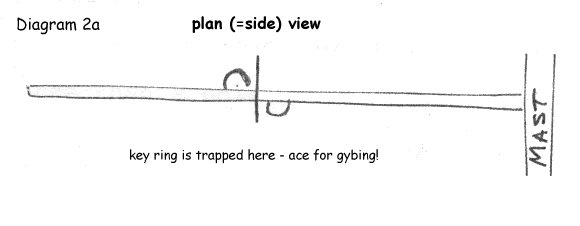 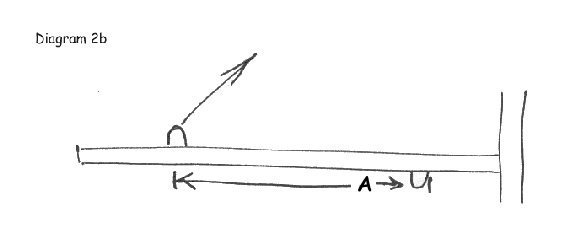  4 from each end of the pole itself, a stainless steel eye should be screwed to the top of the pole at right angles to the pistons. The piston release cord should be led through these with a couple of knots beyond (see diagram 4). The loop or key ring is thus trapped, and therefore cannot twist off the end of the pole, while the knots help the crew to get a grip on the release cord. 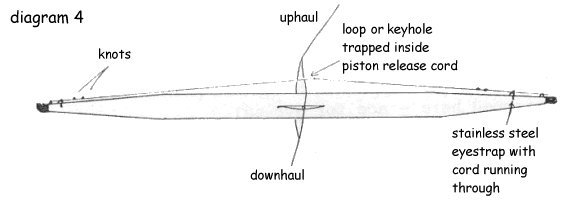 If the pole is stowed inside the boat, then the traditional system of using knots in the uphaul/downhaul is adequate. These can then be wedged into V-cleats at the centre of the pole when in use. Ultimately however, the advantages of stowing the pole along the boom far outweigh its single small drawback of extra weight on the boom. When the pole is not permanently attached to the boat, it is in fact quite easy to lose the pole altogether, say, after capsizing. And poles are rather expensive. The way to find the best pole height for your spinnaker is to hoist the sail. Clip the pole onto the windward sheet and slide it forward until it touches the spinnaker clew. Now raise the pole at the outer end by pulling on the uphaul until a vertical crease appears from the centre of the head. This means that the sail is too flat and the edges have overtaken the middle. Then lower the pole to re-tension the leeches just enough to make the crease disappear. That is then as flat as that spinnaker will ever set. In fact it will be rather too flat for light winds, especially when running. Then more leech tension is needed to hold the air in, and to keep the sail flying. In those conditions therefore, lower the pole a touch further. You should find that the outer edge of the pole needs to be 9-18 above the horizontal. It is very important that there should be no play in the system when the pole is in position, for there is nothing worse than a pole waving about, making a mockery of leech tension. (Uncle Als note: You must however, put a bit of slack into the system any time the pole needs to be moved onto or off the pole eye on the mast!!!) Since elastic must be incorporated into the system, you should therefore make sure that the elastic comes only as far as an eye in order to lock things up. The elastic must be in the downhaul part so that the spinnaker does not have to support the weight of the pole. Diagrama 5a and 5b show typical layouts.
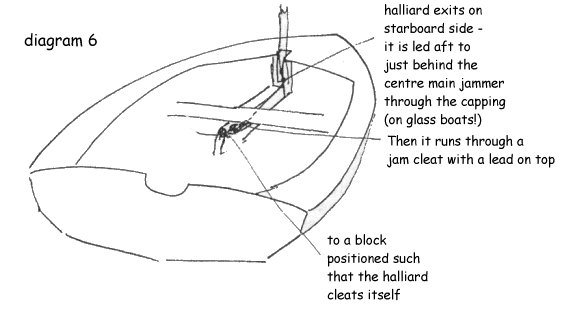
Usually it is only necessary to adjust the uphaul part as the elastic below takes up any slack when the uphaul is eased off and the pole lowered. Then the downward pull of the sheets keeps the pole from skying. When reaching, you can re-tension the uphaul, stretching the elastic to its knot, and raising the pole to its reaching position. The spinnaker halliard should be led back to the helmsman on the starboard side, to a block and cleat near the back of the centreboard case. (see diagram 6.)
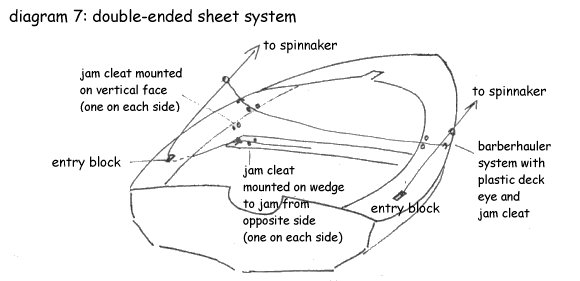
It is also important to get the positioning of the turning blocks right. The sheets from the spinnaker should lead aft to through deck blocks (such as HA 4701), mounted just forward of the aft bulkhead. They should then be led forward under the side decks to the thwart. At the thwart, two systems can be
used:
The spinnaker sheet should be continuous and be about 68¼ feet long and 6mm in diameter. (ed. note: your Uncle Al finds 58 of 5mm. to be quite ample!!) The windward part of the sheet should be marked at one of the cleats so that the pole sets just off the forestay. Another mark, on the leeward part, will to pre-cleat the spinnaker for a close reach. These marks are helpful in keeping the pole off the forestay and the spinnaker leech from being overtightened. Overtightening the spinnaker leech congests the slot between it and the mainsail and the force from the spinnaker is then exerted at right angles to the keel, contributing little to speed but a lot to heeling! Oversheeting is in fact a major problem when flying a spinnaker. Fearful of wrathful comments from their helmsman, many crews will oversheet the spi, simply to stop it from collapsing. What they should be doing in fact, is just keeping the leading edge from collapsing, just so that it is on the verge of curling back at approximately half height. In other words, the object is not to pull the sheets, but rather the reverse, to keep easing and easing. The crew should be trying to get the clews as far away from the boat as possible. Dont worry about getting the two clews at the same height, except perhaps on a run (when it comes almost automatically). So, if the spinnaker doesnt collapse on a reach at least once, then it has been oversheeted and is being kept too close to the other sails. Since the helmsman is constantly altering course to make the most of wind and waves, the crew will have to play the spinnaker all the time. The helm may be able to help with an occasional pull on the windward side. |