the
forestay
Rationale:
(Al's
note: This was written in 1981 and still has validity but on SHADES, we
now have a further modification of this system that will be explained
under
"Forestay Tackle" below.)
The forestay serves no structural function once your jib is up and
properly
tensioned. At that point it becomes slack and does nothing but
interfere
with your jib tickers (wind indicators). What you could use, however,
is
a straight-line reference from bow plate to the hounds (where forestay
is attached) in order to check how far the luff of your jib is sagging
off to leeward while you are close-hauled. To accomplish this, we
replace
the bottom 18" of stay by a shock cord loop rigged in such a way as to
take up slack as the jib luff is tensioned. This keeps the forestay
wire
under some tension (and fairly straight) and out of your jib at all
times.
As a back-up to the shock cord we use a short length of thin line (3
mil.)
which we tie between the end of the wire and the shackle (or cotter
pin)
at deck level.
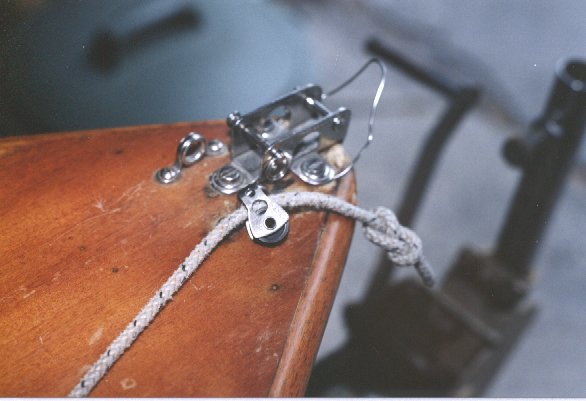
Extraneous
note: The photo below shows one other
item that sort of has to do with the forestay - installation of a
spinnaker
sheet catcher to help prevent the sheet from going under the boat. Ours
is simply thin stainless steel wire the ends of which are wrapped
around
the two front screws under our forestay plate. You'll note that it gets
a lot of abuse:
.....
 .....
.....
Installation:
The shortening of the wire part of your stay must be done with good
wire
cutters and a swaging tool. Before doing this, you take three feet of
¼"
shock cord, and make a loop out of it by overlapping the two ends about
1" and putting a seizing around the overlap with whipping line. Then
hoist
your jib to maximum tension (for a blow), attach the loop via shackle
or
cotter pin at the bow while detaching the forestay there. Keeping the
seized
part of loop away from bends, stretch the loop parallel to the jib luff
until the cord begins to stretch. At the same time pull the stay tight
parallel to jib luff. Mark (with tape) the point on the stay that is
reached
by the top of the loop. Cut the wire there and swage in a loop with
thimble.
Use a small shackle to connect wire loop to shock cord. Tie one end of
the back-up line (with a bowline) around cotter pin or through shackle
at deck and the other with a round turn and several half hitches
through
wire loop.
Note:
I discovered that forestay wire is very stiff and hard to swage and
have
replaced my forestay with wire cannibalized from an old main halyard
which
is much easier to work with!
.....
.....
.....the
forestay tackle
Rationale:
The jib halyard/magic box combination is easily used to put up to 400+
lbs. of tension on the rig. Such pressure translates into mast
compression
which in turn becomes pre-bend when you push forward on the mast about
1 to 2 metres above deck level.
The
problem
with using the jib halyard to get the required tension is that pre-bend
is only needed in light airs when such tension removes all jib luff sag
for which all jibs must be designed. This in turn makes for an
overly
flat luff entry which makes the steering groove unacceptably narrow and
steering consistently within the groove impossible.
What we
therefore do is crank up the tension with the halyard and then take up
any slack in the forestay with the aforementioned tackle. Once the stay
tackle is well tightened and cleated, it keeps the rig tension required
for pre-bend while the halyard can be slackened off to give us any
amount
of luff sag that feels comfortable.
On SHADES, we have
cut enough
off the bottom of our forestay to accommodate a 30-40 cm. tackle which
consists of
-
about 1.5 metres
of 4 mm. pre-stretch
line
-
this is tied to
the becket of
an RWO #R4959 (V-jamming block with becket intended for windsurfing
use)
attached to the bow plate where the forestay used to be attached
-
from the becket,
the line goes
up about 30 cm. to an RWO micro-block (#R1530) which has been swaged
into
the new loop at the lower end of the forestay
-
the line then
leads down around
the sheave of the R4959 before exiting through the V-jammer which we
have
facing aft
The amount of pre-bend
you get depends on
-
how far aft your
spreaders are
angled
-
the amount of rig
tension applied
-
the inherent
flexibility of your
mast section
NOTE:
Abbott masts are harder to pre-bend but word from the Fanshawe Fleet is
that using a minimum diameter (¼”) mast pivot pin facilitates
such
bend.
|