|
N.B. I am still very happy with this set-up
today (26 Fen 06) that I have been using on SHADES for
nearly 30 years, but I urge you to also check out the more modern cascade
system as recommended by Ton Jaspers recently. The cascade system
is the ultimate refinement of what Bill Fyfe was getting at in his vang alternatives referred to at the
bottom of this page, and is becoming the system of choice among top UK
Wayfarer racers.
Rationale:
The boom vang and outhaul are together on SHADES since I like to easily
control both at the main thwart, six inches to port and to starboard of
the centreboard box. The vang and outhaul are both set up for easy
adjustment
with lots of mechanical advantage. This involves mounting a number of
blocks
on both sides and looks complicated but it functions beautifully once
the
initial aggravation of the installation is over.
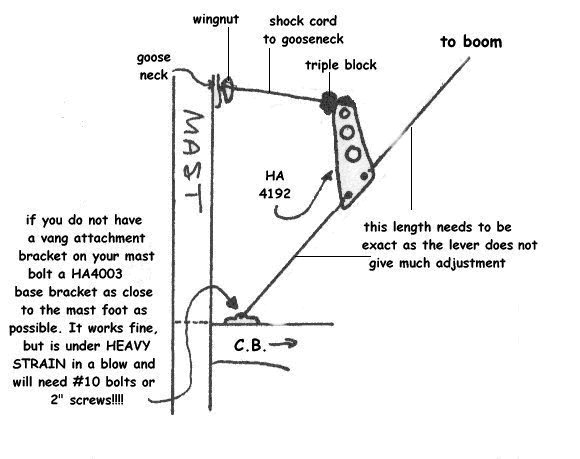
To determine what the exact maximum length should be, hoist the main into its proper position on a calm day. Hold the boom over the centre of the transom with no downward pressure. Now measure the length of the necessary wire-lever-wire unit that is to go between the shackle at the foot of the mast attachment point and the boom attachment point. (If you have a moveable boom attachment point, this length is less crucial, since you can move the boom adjustment as necessary). If this unit turns out too short, you will need to extend it with shackle(s) or whatever you can think of. Otherwise, your vang will be too tight for light air sailing. If, on the other hand, it is too long, the vang will not be effective enough for a good blow. Lever
controls: Our lever is a HA 4192. It is double-sided and has
a U-shape when viewed from above. We shackle a triple block to the top
corner of the lever. Where the shackle pin passes through the "U" we
insert
one loop of a ¼"-shockcord (about 12" long with [seized] loops
at
each end). The other loop goes over the wingnut on the gooseneck to
keep
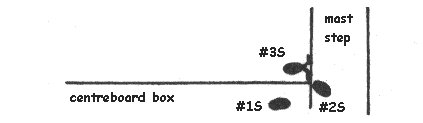
the lever from flopping sideways too much. The triple block meanwhile,
requires four additional blocks: one on each side of the mast step and
one on each side of the centreboard box.
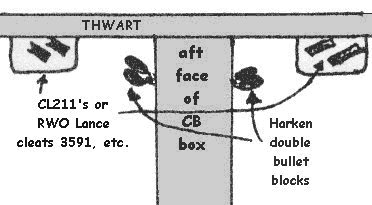
The diagram above shows the set-up as both vang and outhaul controls reach their cleats on the aft edge of both sides of the thwart. The double blocks should have their eye straps slightly aft of the thwart along the upper part of the CB box such that the control line under tension will leave the block about 1/8" aft of the thwart. This results in a smooth entry into the clam cleat (CL 211) (or the Lance cleat, mounted with the cam uppermost, which I now prefer). The CL 211's are mounted on the aft face of the thwart (or a six inch piece of 2 x 4 placed under aft edge of a wood thwart). The cleats should angle slightly up from horizontal to conform to the angle of the rope coming up from the double block to the cleat. Threading the vang control line: We use 5 mil. soft-braid (about 20 feet). Take one end of the line and feed it out through the upper clam cleat on the starboard side. Tie a figure eight knot and leave six inches of loose end for better grip in emergency. Take the unknotted end and feed it through the upper sheave of the double block and forward under the thwart along the CB box. Up through cheek block 1S and through the starboard sheave of the triple block on the lever. Down through 3S and back up through middle sheave of the triple block, down to the port counterpart of 3S, up through the port sheave of the triple block, down to the port counterpart of 1S, back along the CB box, under thwart, into the upper sheave of the port double block and out through the upper clam cleat. Finish with Figure Eight knot and leave six inches of loose end. VANG NEEDS: one lever (HA 4192) plus prepared wires at each end - one triple block (Harken 086) with shackle and looped shock cord - two double blocks (Harken 084), four cheek blocks (Harken 092), two bullet blocks (Harken 082), two CL 211 clam cleats (or RWO Lance cleats) - four eye straps (Harken 073) - all screws - 20' of 5 mil soft-braid rope Outhaul
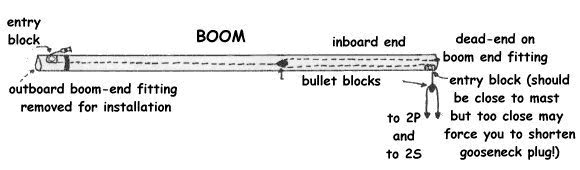
Installation: You will need a swaging tool for this (or you
could use pre-stretched rope instead of wire).
The inboard
and outboard endplates will have to come off the boom. You will
probably
already have an entry block at the aft end of the boom, but for this
system,
you will also need a (small!) entry block on the underside of the boom
at its inboard end. I used a HA-6 for this and put it so close to the
inboard
end of the boom that I had a nasty surprise when I tried out my new
system:
the gooseneck plug would no longer fit into the boom! I got around that
problem by hack-sawing off most of the plug which is now about 2 cm.
long
(and it has worked fine for the past 20 years!). In retrospect, I like
this system because it leaves the outhaul system nice and close to the
mast so that the outhaul is not visibly tightened when I let the boom
out
to a reach or run – which it would be if I moved the entry block too
far
aft! A really small entry block moved aft a bit might avoid the entire
problem, I think. Get the second entry block ready to be installed but
do not rivet it in until its rope or wire is in place. |