|
As I re-read this article, I (still) find it a bit complicated for me to follow completely. If you are in the same boat, you might enjoy my attempt at simplifying this entire routine under the heading Uncle Al's Sail Shape for Dummies. The importance of getting the genoa sheeting
right is very well documented and the sailor has only to look at the superb
flow diagrams in Eric Twinames Start to Win to see how the sail
works. The Wayfarer genoa is a large sail which overlaps the main by some
distance. Its contribution to boat speed is therefore considerable.
Its front is responsible for aligning the air flow over the rest of the sail plan. Thus, getting the angle of attack right is vital, while at the back, the leech has to deflect and then squeeze the air through the slot. If the leech is too tight, the air gets stalled, and if it is too slack, the air is not squeezed enough. Both these aspects of the genoa, angle of attack and leech tension are controlled by
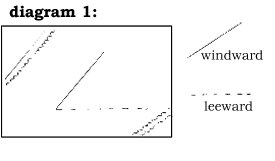
the sail is difficult to read and is prone to stalling. Luckily, setting up the sail is very straightforward. It is simply a matter of organizing the best positions for the fairleads, both fore and aft, and athwartships; of controlling the rig tension, and perhaps most important of all, of calibrating the sheet tension. The best way to do this is to enlist the help of wind-tufts. Approximately 4 (10 cm.) long, these should be positioned 6 (15 cm.) or so from the luff and away from seams as they become snagged in stitching. If they are placed at quarter, half and three quarters height along the luff, they will give some idea of the air flow over the sail. As diagram 1 shows, the windward tufts stream slightly upwards when indicating correct sail trim, whilst those on the leeward side stream horizontally.
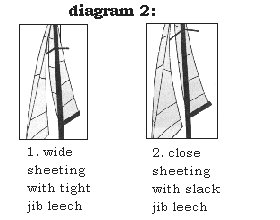
They should all work together, with the top windward windtuft angled up slightly more than the other two. This will mean that the sail is sheeted correctly with just enough leech tension to control the whole sail. This leech tension comes from both the angle of the sheet, from the clew to the fairlead, and from the tension on the sheet itself. As a general rule, the middle leech will move about 5 for every inch the sheet is moved through the fairlead. Considering this 5:1 ratio, it is therefore very important not to over-tension the sheet. If in doubt, ease the sail until the top windtuft collapses and then sheet in a bit to bring into line. It is a good idea to mark the sheet somewhere near the fairlead to help quantify things. The centre of the fairlead track should be approximately 530 mm. from the centreline and some 2350 mm. from the transom. Although some success has been found on boats fitted with sideways adjustment, it really is an unnecessary expense. There is also no need to lead the genoa sheet aft to a jammer on the thwart. This is not only an unnecessary expense but adds complication. All that is required is a simple track with fairlead and integral cleat. The modern close-sheeting genoas have to be cut fuller because the closer in one sheets, the more the leech has to be eased to keep it away from the mainsail. It is this easing with its reduction in leech tension which makes the closer sheeting angle work so well. As diagram 2 shows, the closer sheeting angle and eased jib sheet allow the jib leech to follow the contour of the mainsail. This gives a constant slot width between the back of the jib and the front of the main.
A wide sheeting angle with its tighter leech
results in a slot that is narrow at the top and wide at the base. Unfortunately,
then the slot can only be right at one place along the entire length.
The fairleads should be positioned, and the sheet ten-sioned, so that all three windward windtufts collapse at the same time, and so that the back of the jib parallels the leeward bulge of the mainsail (i.e. to give a parallel slot). If the slot is right but the top tuft lifts first, try mo-ving the lead aft slightly to enable you to keep a parallel slot while sheeting in tighter. If the bottom tuft lifts first, reverse the procedure. To do this check on land, choose a day with 8 to 10 knot winds. Position the boat in clear, non-turbulent wind, put appropriate tension, about 330 lbs., on the jib halliard, and put the boat on a close-hauled course. Once all the windward tufts lift in unison like well regi-mented soldiers, you may wish to check the angle of attack by standing directly in the eye of the wind about 20 feet from the boat. If the windtufts are doing their job properly, you should be able to see neither the windward nor the leeward side of the jib throughout the luff length. If you can see one or the other side, then you will have to start again. For instance, if the leeward side at the bottom is exposed, the sheet has to be moved further aft to flatten the bottom of the sail. The further forward one has to stand in order to get this in line effect, the better the boat will point, and vice versa. At this stage, it is possible to see if a closer sheeting angle will make you point better, simply by pulling the sheet in towards the centreline between the lead and the clew while re-organizing the fore and aft tension to get the tufts working properly once more. If you now have to stand further forward to get that luff coming straight towards you, then you will point better. A final check of the slot is now in order. If everything is as it ought to be, you should still see a parallel slot between the back of the jib and the leeward bulge of the mainsail, when you stand aft of the boat. (Als note: On SHADES, we simply put the lead in a position where, with the genoa sheeted in, a straight line from mid-genoa luff through mid-clew cringle would meet the front seat. What with 5 of upper leech coming in for every 1 of sheet, it is simply a matter of sheeting in until the top and bottom tickers flow the same way, i.e. when I sail to keep the lower tickers in the position shown in diagram 1, my crew adjusts the sheet so that the upper tickers match that position [or we get the same effect by using the upper leech ticker on the genoa]. By moving the lead forward, we get the required leech tension sooner and end up with a fuller foot [parallel to eased outhaul on main], and by moving the lead aft, we get to the required leech tension later and end up with a flatter foot. For what its worth, we have not moved our genoa leads from their standard position for years!) In a breeze, one particular problem facing Wayfarer sailors is genoa luff sag. Excessive jib luff sag not only makes the front of the jib fuller to ruin pointing, but also hooks the leech to congest the slot at the very moment when the main is also being eased out to keep the boat on its feet. Obviously, this reduces the efficiency of the sails. To counteract the problem, increased rig tension is needed via a tighter jib halliard. This is achieved either by adjustment of a Highfield lever on the back of the mast or, better still, a magic box or multi-purchase blocks on the centreboard case. The halliard should be tensioned to suit various conditions - just enough tension to keep the leeward shroud from being slack while sailing closehauled. With the correct amount of jib luff sag, the jib is opened to make the slot wide enough and to reduce the amount of curve that the air has to make, flowing over the jib. Once you have marked the fairlead track for the medium weather position, move the fairlead aft until the windtuft at three quarters height collapses and then move the lead one inch or so forward. This heavy weather position should also be marked. Never go behind this mark because the collapsed windtuft shows that the sail is feathered and that the air flows equally past it on both sides. It has no drive and simply acts as a flag. Without this drive, the boat cannot point so well and falls away from the wind slightly. This is well worth remembering when considering pointing ability, for it does not necessarily follow that poor pointing comes only from having the sail too full at the front. It can also come from having the top of the jib (or main, for that matter) feathered. Usually, jib luff sag means that this offending part is hidden away from the helmsmans sight behind the mainsail. If the top windtuft has feathered, pointing the boat according to the bottom windtuft will slow the boat down. Nearby boats will be pointing about the same but will be going faster, so the helmsman bears away to go the same speed, but then he finds he is having to sail further. This can perhaps be described as a psychological non-pointing. The solution is easy, involving nothing more than moving the fairlead forward to bring the top of the jib into action. If this doesnt improve pointing, then the front of the jib may well be too full because of jib luff sag. To avoid these problems, a few moments have to be spent before every race and up the beat to check that
In order to be able to ease the sail to put in that extra fullness, the fairlead must be moved forward almost to the point where the bottom windtuft collapses. When easing the sheet to give increased fullness, you should slacken the jib halliard a little as well. This gives extra luff sag which helps to increase the fullness. Once the light weather lead position has been established, it too should be marked. It will be seen therefore, that boats point best in the middle winds when the sail is at its most efficient. They point progressively worse as the wind gets up or dies away. Although the careful marking of the light, medium and heavy weather fairlead positions can help, the sailors themselves can improve things considerably. It is the job of the helmsman to constantly
watch the bottom windtuft to keep the boat pointing properly and it is
the job of the crew to watch the top windtuft, using the motto if it collapses
sheet in, and if it hasnt collapsed, ease it out. He must therefore be
prepared to keep the sail constantly on the move. This enables the helm
to get the lower windtuft working and keep the boat in the groove, knowing
that the leech is on the move to keep the angle of attack, and
If anything, it is better to have the sail undersheeted, so that one has a nice easy backwinding to spot, rather than to have it too tight and stalled, which is much harder to see. This is important not only in light winds when there is no movement of the jib sideways which makes it very easy to have a choked slot (see diagram 2), but also makes heavy air sailing easier as the boat will not be flattened by the gust before the helm has a chance to feather the main. Even if the spinnaker is used off the wind, some attempt to sheet the genoa should be made to create a slot between the spinnaker and genoa, and the genoa and main. The helm has to do this because the crew will have his hands full. So try to get the windtufts flowing even on a reach or broad reach. On a run, the genoa will of course be blanketed, so ease it as far from the main as possible without letting it flap. Finally, by keeping a close eye on other boats, particularly those at the top of the fleet, and by religious reading of Class magazines, it is possible to keep pace with the sheeting developments. It is not a bad idea either, to find out what happens in other classes, but nothing works so well as that constant patrolling round the boat in the dinghy park to see exactly what things look like from all angles. Wayfarer Genoa: Setting up Guides
Mike
McNamara,
|
|||||||||||||||||||||||||||||||||||