...
Ton Jaspers, Dick Harrington and Ken Jensen
share some of their W reefing & heave to expertise


* of jib reefing and muscle boxes 
* Richard Watterson's reefing query brings flood of responses
*
Ken Jensen's plug and routine for roller reefing
* Uncle Al responds further to Ken's e-mail above with fresh thoughts on heaving to, etc.
*
one last word on heaving to from Ken
....
Subject: of jib reefing and muscle boxes
----- Original Message -----
From: Pete Haak (Mistral 788)
Sent: Sunday, April 01, 2007 5:29 PM
Subject: Boat stuff

Hi Al,
 
I am sure going to put your tuning advice to good use. I can see where I have had some bad habits in the past. Thanks for the info!
 
I know I've already asked you regarding reduced head sail and I also know everyone is busy getting ready for this sailing season but I'd also like to know as an associate member with a Mistral which of this year's Wayfarer activities might be appropriate for me to participate in.
 
Let me know when you get a chance
 
Thanks in advance!
 
Pete Haak
Mistral 788 


----- Original Message -----
To: Pete Haak (Mistral 788)
Sent: Sunday, April 01, 2007 10:53 PM

Hi, Pete:
 
I'm happy to hear that you're finding the materials helpful.
 
You are welcome to join in everything except Nationals and the North American Championship. US-based regattas are still iffy and at the moment you'd have to ask on a case-by-case basis. Cruising-wise, you've already been invited to the Rally at Killbear and will be welcome at anything else that may come up. The Rally - July 21-27 at Killbear - would be an ideal way for you to get acquainted with the gang but you may have trouble getting a campsite by now. However, if you are interested, let me know and I'll pass you on to the main organizers who can put you onto the email group list where we can see if anyone would have ideas, e.g. campsite sharing.
 
Take care,
 
Uncle Al (W3854)


----- Original Message -----
From: Pete Haak  Mistral 788
Sent: Wednesday, April 04, 2007 7:28 PM

Hi Al,
 
The Rally at Killbear would have been a good start but it conflicts with my company's annual vacation. Not enough whiskers... I have my eye on the activities the CWA has planned around Canada Day at the North Bay YC. From the description of the event there will be lots of different sailing activities and things to see and do. I will have just finished up my Champlain Lake cruise at that time. I'll bring pictures. I hope I'm still in the mood for more sailing by then! Any info regarding shortening head sails would be appreciated.
 
Thanks,
 
Pete Haak
Mistral 788


-----Original Message-----
From: Al Schonborn [mailto:uncle-al3854@cogeco.ca]
Sent: maandag 16 april 2007 19:01
To: Pete Haak
Cc: Ton Jaspers; Dick Harrington
Subject: shortening sail

Hi, Pete:
 
I do hope we'll see you at North Bay!! Regarding headsail shortening, I gather this can be done with furling gear used partially - Dick Harrington and Ton Jaspers copied for their potential input. A cheaper option would be to sail under main alone, especially a reefed main for better boat balance. Cruising guys do this all the time! Of course you'd need to either avoid getting into irons or learn how to get out of irons. Even in the fairly windy conditions a couple of days during last year's Rally on the St. Lawrence near Kingston, Julia and I sailed with full sail upwind and just ragged our sails as much as it took, and did just fine. One "leg" was a dead run home where we sailed under jib alone and that worked a treat as always - no good for extended upwind work though! I'll copy you in another answer I have coming up that deals with a similar question and will give more details.
 
Take care,
 
Uncle Al (W3854)


----- Original Message ----
From: Ton Jaspers (W10445)
To: Al Schonborn <uncle-al3854@cogeco.ca>; Pete Haak
Cc: Dick Harrington
Sent: Monday, April 16, 2007 4:48:28 PM


Hi Pete, Linda, Al, Dick and others,
 
I think Dick uses the double headsail method that I have seen used by many others. Both the (storm jib and genoa are hooked on at the tack, one of the sails is tied to the deck while the other is in use. Changing sails can thus be done from inside the cockpit. The typical mahogany handle bars are in a perfect location to tie the unused sail to. I am sure Dick will tell us more about this system.
 
I use a roller furler, got used to it and don't want anything else anymore. I have just created a short essay on the subject in Dutch but I'll translate it for you guys. Please remember that I am somewhat biased because I sail solo quite a lot. Sailing solo in a Wayfarer is much easier with a reliable furler. After all, a crew of two almost has the same weight as the boat (168 kg, heavy crew). Going out solo is almost the same as leaving 25% of your ballast weight home (apologies to Conny).  Here we go with my translated article:

Dear Ger and Petra,

It is a simple question, unfortunately the answer is a bit more complicated. First of all you need to ask if you want a device to furl away the sail altogether or a device to reef the headsail.  These devices are distinctly different. 

1. Furl-away systems  If you only want to furl away the headsail  you need a furler and a top swivel. It is not possible to reef with this equipment. The wind would unroll the sail immediately and you end up with a small part of the sail rolled up at the tack. In heavy weather, this even happened to me when the sail was fully furled away. As usual, this only happens when you least need it, when the going gets tough. I have learned this lesson the hard way, and sail with a reefing furler ever since. Another problem with the furl-away system is that you need something to keep the forestay out of the sail. With full tension on the jib halyard, the stay is slack and is easily rolled into the headsail. The stay needs to be kept away from the headsail luff, with some iron wire or a plastic triangle or a disc (a CD) and some bungee. Despite this arrangement the stay still gets caught sometimes.
Unless you get the Harken High Load Roller, you also need a muscle box or cascade pulley system that enables you to take the tension off the rig while sailing. With the exception of the Harken High Load furler most others will not turn under load.  Altogether it is a simple, cheap but far from perfect system.     

I have found a page that shows most of the existing furler systems on one page: The Harken High Load is HK164 and HK165 (As a set they are called HK453 and possibly a little less expensive).  I used to have the SeaSure furler shown on that page but it never worked unless I took the rig tension off before operating it.

2. Reefing systems. The difference between a furler and a reefing furler is a stiff tube between the furler and the top swivel.  The head sail is connected to this tube, usually in the same way as your main to the mast.  Because of the stiff tube the swivel and the sail cannot turn independent from the furler. A second difference is that the stay goes through the tube and can't be caught by the sail when it is furled. The down side of this arrangement is that the stay needs to turn with the sail and the bearings need to be very strong as they do not only take the load from the sail (rig tension) but also are part of the safety system (the stay). They must be so strong that they are the last part that fails when all hell breaks loose. This is one of the reasons these systems are significantly more expensive then simple furl-away furlers. Finally there is a safety wire parallel to the halyard. The safety wire keeps the mast up when the halyard breaks or is accidentally loosened. The stay inside the furler tube is in my case 5 mm thick, hence it is reasonable to expect that to be the last part to break A standard Wayfarer stay is only 3 mm thick. There is a drawback with this arrangement; the safety wire requires the system to be set together with the mast. In my case I have the sail already in but is would be easy to hoist the sail after the mast is stepped. To protect the headsail (I don't take it off) I had a cover made that closes around the sail in to a tube using Velcro. The tube is hoisted with the spi-halyard.  

I have seen four different reefing solutions that I shall describe briefly. 

There is a system by Rob Harland from the UK that is basically a Harken High load system completed with a stiff tube (tyleen tube?) that is cut open length-wise and worked over the luff of the headsail from furler to swivel. People that have it are satisfied with it, but have seen that it still torques a lot and it looks awful. The issue with the forestay getting caught still remains. The only real advantage IMHO is that it is cheap.

A far better system is available from Holman (who took it over from Jack Holt). It is a round aluminium tube that is cut open. Because it is just that, it still torques a lot in comparison to an aluminium profile with a separate sail groove. The furling drum is ugly plastic (grey PVC) and rather large. The stay runs through the pipe. I think it looks ugly on a Wayfarer but it serves its purpose. Users are very satisfied with it. 

One step up is a system by Plastimo. Actually it is designed for a small yacht.  I have seen it used on a Wayfarer once and I don't like it. It is almost as expensive as the next one, it looks ugly. There is a lot of plastic used, especially on the drum that is over-sized in comparison to a Wayfarer bow. For that kind of money you are much better of with the next system.

A system specially developed by Bartels GMBH in cooperation with yours truly (no discounts, shares or profits for me) (Al's note: click here for details). It is the Rolls-Royce among the Wayfarer furlers. Made solely of stainless steel and aluminium with German precision. The tube is a true drop-shape aluminium sailing profile with a separate sail groove. The furler, the swivel and all bearings (three in the swivel and three in the furler) are stainless steel. The system is designed to take a load about five times the standard design load of a Wayfarer. The tube is only 16 mm in diameter (widest measurement) and the drum has about the same modest dimensions as the Harken furler. All dimensions are fitting for a boat the size of a Wayfarer. It is the most expensive system available, but it works with absolute reliability and has only one drawback, the aforementioned safety line that requires it to be set together with the mast (The Holman system has a safety line too). 

I took the proto-type to Pinell & Bax (UK) who made a special sail for it. They compensated the higher tack position. The Genoa touches the deck despite the tack being above the drum. Next they added an asymmetric strip of foam to the luff and cut the sail a little less deep to ensure a good sail shape in a reefed position.  Then I had Ian Porter rig it to the boat. The results will be reported back to Bartels as soon as I find the time. Bartels has promised to create a package and make it available through their web-site. Once this is done, all the world can mail order the system from them and the special sail from P&B who have saved the design in their computers for all of us.   There are some pictures of my furler on the Yahoo Wayfarer group (file section). And it may be visible on the pictures from Dick Harrington's rally report

Some useful links:

Simple furlers:

Reef systems:

Pinnell & Bax sail makers: http://www.pinbax.com/

From a friend, I got this link: http://www.top-reff.de/   I don't know these guys but their web site looks impressive.

The Wayfarer Yahoo group:  
http://groups.yahoo.com/group/wayfarerdinghy/ 

A final remark:  With any system, you need a guiding eye to ensure that the control line runs in a straight angle into the drum. I am still figuring how best to lead the control line aft without compromising the buoyancy tank or violating class rules.  For the moment I have a cleat
on  deck, in front of the breakwater but I find that highly unsatisfactory.

Best wishes,

Ton Jaspers (W10445 - Swiebertje)


----- Original Message -----
From: Richard Harrington
To: Ton Jaspers ; Al Schonborn ; Pete Haak
Sent: Tuesday, April 17, 2007 12:48 AM

Greetings, all:
 
It is certainly quite difficult following Ton.  (Ton, your fabulous explanation of the different rolling furling and reefing options is one of the best I've seen.  I'm going to make sure I keep this in my files.)  Margie and I enjoyed the pleasure of sailing Ton's Wayfarer Swiebertje while in Holland and I can attest to the excellent performance of his Bartels system.  It is foolproof and can be easily operated by any amateur.  If you really want to please your wife, girl friend, or whomever, and you have the money, that's the way to go.
 
On the other hand, let's assume that you have no money to spend but by some accident of fate have acquired a small jib (from some other dinghy type?) which is about half the size of the genoa.  In very windy conditions, that small jib will come in handy as it will reduce sail area while helping to balance the boat and continuing to maintain a slot for the mainsail (better pointing ability).  [A couple of years ago up in Maine, Tom Graefe and I ended up one day with the unusual combination of a double-reefed mainsail along with the small jib.  The boat exhibited just a wee bit of lee helm.]  As Ton mentioned, if it appears the small jib may be wanted (or vise versa with respect to the genoa) hank both sails onto the tack fitting (I use a quick release shackle) and tie off the unused sail.  Here I need to tell you that tying down the extra sail isn't all that easy, as waves coming over the bow and across the deck very quickly want to pull the sail overboard.  Tying to the deck handle is good but you also need to bring the top portion of the sail into the cockpit and keep everything taut.  But that is just the start of things. 


Two other elements that need addressing when changing headsails on the fly, are releasing the halyard, and switching the jib sheets to the new 
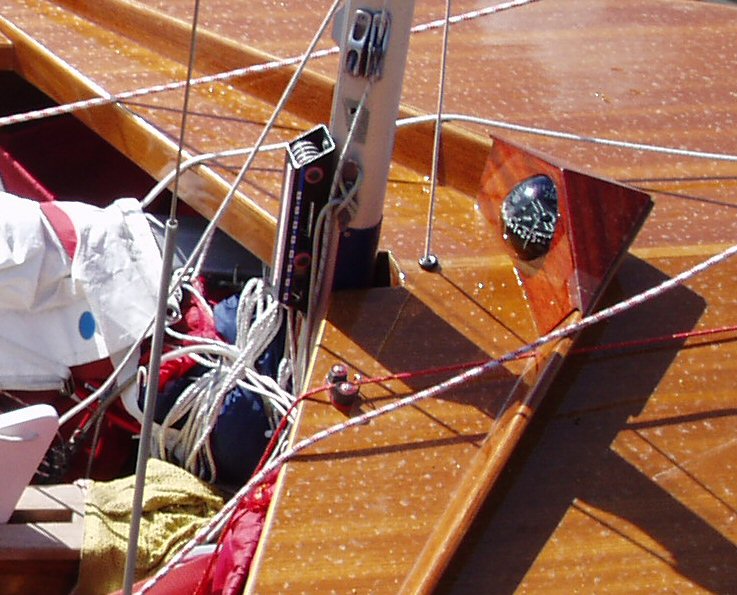
sail.  Switching jib sheets first.  I use the ball and loop system which is easy and fast and requires no tying or changing of sheets (see photo above).  Releasing the halyard.  Being an ex-racer, I'm obsessed with having a jib luff that does not sag too much (modern sails are cut for that).  So, for many years, I continued to use my racing set-up with the wire halyard and the loop that slipped over a hook on the magic box.  But when things got dicey, there was always the question, can I muster the arm strength to get this loop off of that damn hook.  There were times when it was a close call.  Finally, on one cruise, the wire broke and I was forced to replace it with a rope halyard.  It was then that I developed my present system of using the magic box on a rope halyard that is cleated at the mast.  Now all I have to do is uncleat the rope and down comes the jib.  It works like a charm.  Presently, I can switch jibs in less than two minutes singlehanded under any conditions.  I took photos a while back that I have yet to load into the computer.  If anyone is interested, I can do that and send them.
 
DICK


----- Original Message ----
From:
Pete Haak  (Mistral 788)
To: Richard Harrington ; Ton Jaspers; Al Schonborn
Sent: Tuesday, April 24, 2007 4:22:43 PM


Hello Dick,
 
Pictures of your magic box system would be quite appreciated. I will be singlehanding during my Lake Champlain cruise and I have found a smallish jib to use when I'm reefed when things get heavy as they often do on that lake. The southwesterlies can really get up in the late afternoon. A proven method of changing headsails safely while underway would be most welcome indeed! 
 
Thanks very much in advance!
 
Pete Haak
Mistral 778


-----Original Message-----
From: Richard Harrington
Sent: woensdag 25 april 2007 4:26
To: Pete Haak; Ton Jaspers; Al Schonborn


Okay, Pete.  I'm digging into the pics right now and will get back to you.  I'm thinking that it may also require a diagram in order to pull it all together.  It looks complicated but once you've got it together the rig works like a charm.  I've been kicking myself for not doing this sooner.  It wasn't until the wire halyard broke while I was on the Chesapeake and wasn't able to get a replacement that I got the inspiration.  Just looking at the sag in the jib luff as a result of using the rope halyard with a tension adjuster drove me nuts right away.
 
DICK


----- Original Message -----
From: Ton Jaspers
To: 'Richard Harrington' ; 'Pete Haak' ; 'Al Schonborn'
Sent: Wednesday, April 25, 2007 2:40 PM

Hi all,

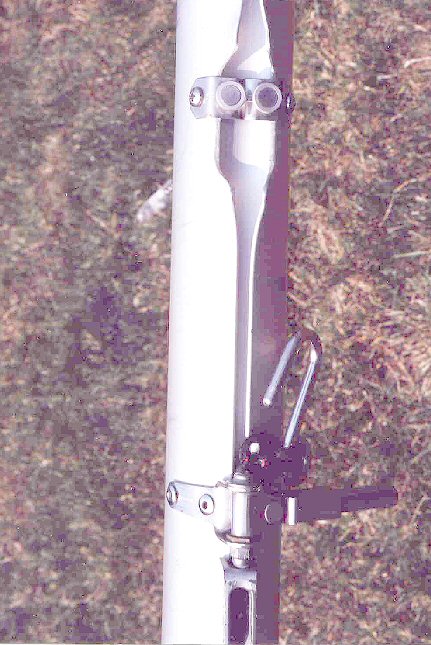
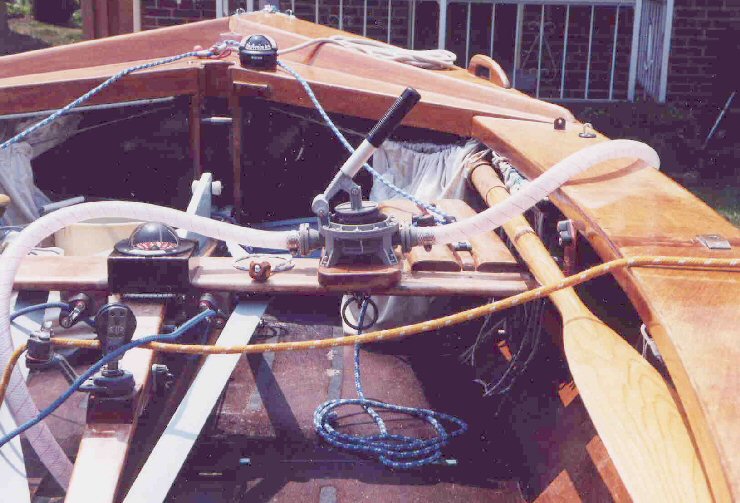
Below are a few pics of the muscle box set-up I use on my W. Mind you a muscle box has a lot of sheaves and those cause friction. A cascade system has much less friction and is much cheaper. Despite that, I have yet again a muscle box on my new boat, because I like the neatness of it, no ropes and blocks all over the place. The cascade system used on most new English boats today is very similar to the cascade kicker shown on the WIT. The only difference is that it lies flat around the CB on top of the case (on both sides of the CB). And it does not need steel wire nor steel wire blocks.

Harken does not make their very fine muscle boxes any more. I got mine from Sprenger (Germany). Sprenger have dealers all over the World but you can also mail order direct from them: http://www.sprenger.de/hs/   The muscle box is at the top of page 94 of the catalogue (10MB PDF, alert!) http://www.sprenger.de/hs/abt_boot/produkte/boot_05gesamt.pdf I use the biggest one: 36618 0095 53. If you decide to order it, don't forget to order the hook as well: 13218


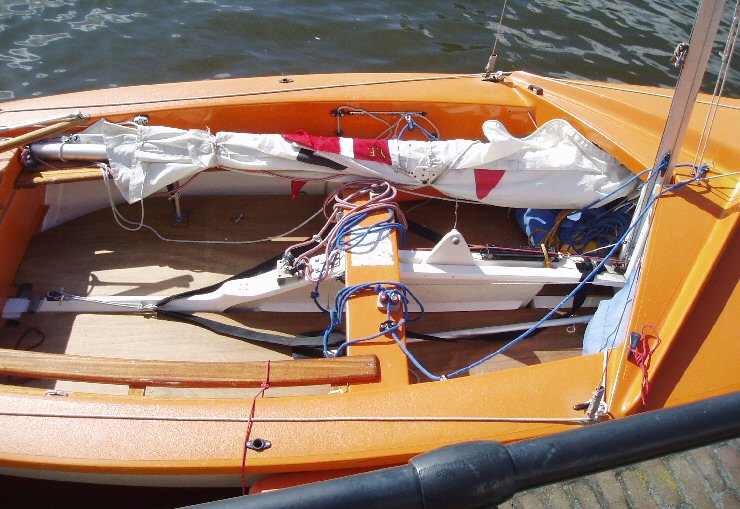
muscle box on port side of centreboard box just forward of the board itself  on Ton's old Wayfarer


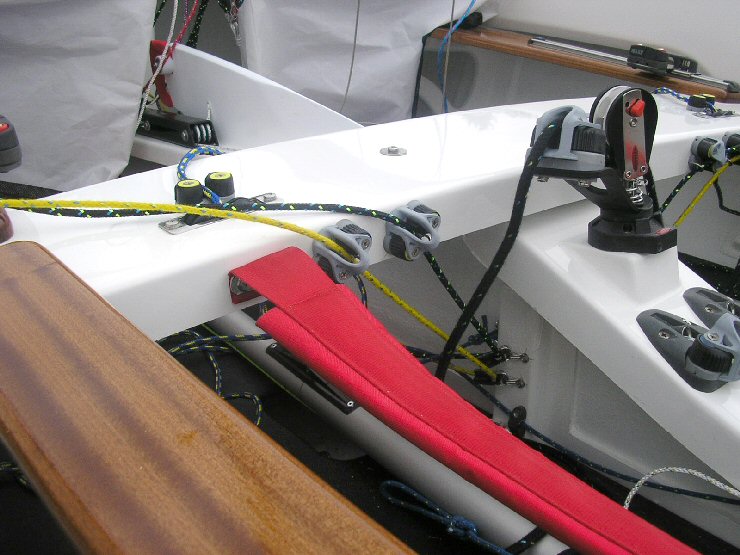
The new set-up on this Porter Brothers beauty is the Rolls Royce of set-ups: The white speckled line used to adjust tension leads aft along the port side of the board, goes under the thwart and ends up ...


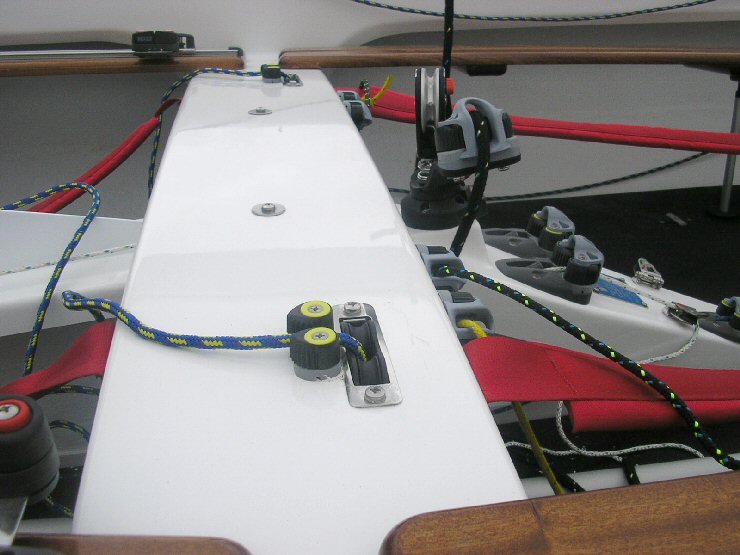
... emerging from underneath the centreboard box cap just aft of the thwart where white speckled rope passes through a cam cleat with ...


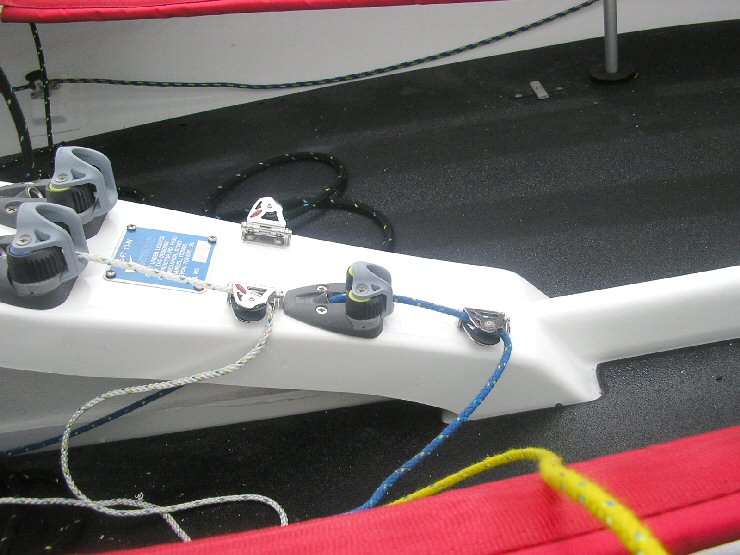
... the grey housing that keeps the line centred above the cams. That last little touch is a block that stays aligned but can swing 180° to either side, thus enabling the hiked out helm to adjust from either side of the boat. As I said, the Rolls Royce of magic box set-ups.

My muscle box is attached
to the top of the CB box with four self-tapping screws, slightly slanted relative to the centre line, in such a way that it follows the straight line from the mast foot to the cleat. The cleat arrangement consists of a through deck bushing (with SS insert) in front of the thwart, just above the CB case. The control line goes through it, passes under the thwart  and comes up through a through-deck cleat base by Holt (number HA4771). On that base is a Ronstan carbon cleat (RF5010). I like those better then the Holt Allen ones, Harken Carbo is perhaps even better but so darn expensive over here (Europe). The cleat is completed by a Front Fairlead (RF5015). Behind the cleat is a Ronstan "mini" series 30 pivot lead block (Nr RF30174). The flip block ensures the control line runs through the cleat when the line is pulled. To release it you just grab the control line between the flip block and the cleat.

After hoisting the Genoa, the SS-halyard goes over the hook of the muscle box. I then give a good yank on the control line et voilà, lots of rig tension to enjoy.

Hope this helps, Cheers, Ton

...
Subject: Richard Watterson's reefing query brings flood of responses
----- Original Message ----
From: richard watterson
To: dick harrington
Sent: Wednesday, April 25, 2007 9:36:44 AM
Subject: reefing


Hi Dick;

Could you give me a step by step description of how you reef?  When I practice it, I tend to get things out of sequence and have to ad-hoc do it.  This is OK when practicing, but unacceptable when it has to be done quickly.  Also, I need to get a compass, do you have any recommendations?  I looked at the aps ltd web site and they have some but I couldn't determine how much work would need to be done to install it (drill holes, etc).  Should I get one to mount on the thwart or the mast, or the deck?  Thanks.  

Richard Watterson


----- Original Message -----
From: Richard Harrington
To: richard watterson
Cc: Al Schonborn ; Tom Graefe ; Ton Jaspers; KEN/K.H.Jensen
Sent: Wednesday, April 25, 2007 2:30 PM

Richard,
 
Reefing is the easy part.  The compass.....well, there you'll find lots of different opinions.  I use two different styles.  So I'll 'cc' Uncle Al, Tom Graefe, Ton Jaspers and Ken Jensen---which means we can expect some lively, meaningful discussion to follow.
 
REEFING
I assume that for the main, you use a rope halyard that is cleated off on the side of the mast below the gooseneck.  The typical racing set up using wire with a loop that hooks onto a rack at the base of the mast is no good.  The rope tail that comes with that arrangement is not intended to take any working load.  (Al's note: Actually, I am certain that you can  use the rope tail around a cleat, since the working load on a main is pretty minimal - the weight of the mainsail??) Thus, your the rope halyard should exit near the foot of the mast through a sheave and lead up to a mast cleat.
 
On Blue Mist, I always reef from the starboard side.  The main halyard cleats on the starboard side and my jiffy reefing line for the first reef leads back to a jam cleat on the starboard side of the boom.  The reefing line for the second reef runs on the opposite side which means that when taking in that reef, I have to reach under the boom.  That doesn't really pose a problem.  For the tack grommet I use a reefing hook which is attached to the mast.  I have also seen good looking reefing hooks that screw onto the boom.  When taking in the second reef I switch the reefing hook to the new tack grommet.  A tack haul down line isn't needed as the sail readily comes down with just a slight tug on the bolt rope.  When putting in a reef I use my right hand to work the halyard and my left to work the jiffy reefing line.  To keep the boat on course I use a bungee on the tiller which keeps the rudder centered.  (Al's note: I presume that your sails are luffing all this time, Dick?? A trick worth trying is what I have called the "rest and relaxation position" which in essence involves luffing the sails and bringing the board full up until the boat stabilizes in a beam reach position with no forward momentum and the sails left to rag. At this point you can safely leave the tiller. As long as you keep a slight leeward heel on the boat, you should be perfectly safe to do the various reefing tasks. Even pulling the boom in briefly to accommodate any reefing tasks that may require this, will be OK, since the boat will try to move forward and luff up but the complete lack of centreboard effect will prevent this and result in sideways drift instead. One of the several beauties of having the board full up is that in these breezy conditions you will drift to leeward at enough speed that an unattended and unbungeed tiller will automatically assume and keep the safe "luffing up" position because the rudder will angle to windward due to the sideways drift. The only thing you must beware of is letting the jib fill, since this would indeed make you bear away and pick up speed at which point all hell could break loose. A further benefit of this system is that it leaves you less vulnerable to gusts while you're away from the tiller, since the boat can't "trip" over the board. All of this does of course, pre-suppose that you have ample "sea room", i.e. there is no lee shore excessively near.)
 
A normal situation is where the wind has picked up to the point when it become obvious that putting in a reef will make sailing more comfortable but nothing really drastic is going on.  The size of the waves could be a factor and heaving to is the conservative option, but I rarely find it necessary to go through that extra step.  (Al's note: in gusty winds, the R & R position is even safer than heaving to - and if you do heave to, do so with the board full up unless you need to reduce leeward drift.) When there are two of us, I invariably just have my crew keep on sailing while I put in the reef and with the jib at least partially pulling.  When alone, I'll release both sheets and fix the tiller, attempting to hold the boat on a reach and moving forward. (Al's note: While I myself am an admirer of speedy sailing, I think we do need to point out that the ability of the boat to turn violently is directly proportional to its speed through the water. It is thus safest to completely kill off forward momentum and thereby to reduce the risk of a sudden turn to zero. This is the same principle involved in dealing with self-rescue after a swamp or capsize, where your first action (after righting the boat, of course) should be to get the board full up and luff all sails until there is no forward momentum. Then you can leave the tiller and start bailing.)

The steps are as follows: 
1)  Release the vang so that the boom is free to rise. 
2)  Take in one or two good pulls on the jiffy line so that the line is taken up about half way or more.  Jam it good!  (The British recommend taking the reef all the way, but that puts the end of the boom way up high.  I prefer to do it in two steps.) 
3)  With the right hand uncleat the halyard and with left haul down on the tack until the boom is about level again. 
4)  With the left hand again haul in on the jiffy line until the clew is almost, but not quite tight to the boom.  (This is to keep from pulling the foot of the sail back on the boom.)   Jam it good!

 
5)  Feed the luff of the main down until you're able to set the reefing hook (above) into the grommet, then tighten the halyard and cleat it off. 
6)  Finish off tightening the clew with the jiffy line and reset the vang. 
7)  This whole process can be done in about three minutes. 
8) If everything is still under control, go ahead and tidy up the loose body of the mainsail by tying the reef points around the boom, otherwise wait until it is more convenient.
 
As you know, I use a very light weight bungee cord with clips that is woven through the reefing grommets for bundling up the loose sail.  That comes from the British and it is much much faster than trying to make reefing ties.  Recently I've seen they've switch to individual bungees with a loop and ball.  Ton Jaspers has this on his boat and it worked very well when I sailed his boat in Holland.  The big loops I have running through the sail tended to catch on stuff when the sail is in the cockpit.  In any case, it usually isn't too much trouble to gather up the forward portion of sail which gets ninety percent of the loose stuff.  But since the boom needs to be hauled in to finish the process, it sometimes isn't worth messing with the last outboard loop when you're alone. (Al's note: hauling the boom in to "finish the process" will most certainly be facilitated by doing so while in the "R&R position", i.e. no forward momentum and the board full up.)

Ton Jaspers: This is how I do it as well. 
 
I use a quick release (and quick to reset) shackle on the vang. Make sure the snap shackle is strong enough for the purpose. 
 
I am not going to repeat the discussion of some months ago (look it up here) but I have first reef higher up (4" above the first batten) and I don't have a second reef. I believe the standard first reef is useless. That amount of power reduction is easily achieved by trimming. Once the first reef is higher up the need for a second reef is far less. I have sailed the North Sea up to a force six/seven and lately an inland regatta at force eight. I think that if I should ever need a second reef I'd better take the sails away completely (and cry for mommy). These are strong statements but keep in mind that I have the perfect Genoa reefing equipment. Balancing the boat is so very important and it is easy with this equipment. A balanced boat is far easier to sail, less tiring and therefore safer. And if it really gets rough, the genoa has a bolt rope (needed for the reefing furler) that allows it to be used as a try sail in the mainsail's mast groove as described by Ken Jensen.
 
The bungee/ball arrangement Dick refers to, was born after the sailmaker forgot to put anything in the grommets.
 
On my old boat, I used to have the big (English) loops with the little nylon in the middle hooks that grab anything but each other. I decided to replace them by some balls on the loops but that didn't work. Then I took some whipping twine and whipped the bungee together an inch or so behind the balls. That worked! And I sailed for many years with that arrangement. But still there was a problem. As Dick describes, the long loops catch anything they can and even make a mess of the sail when it is down. When I went out with Swiebertje the first time, I needed to find a solution quickly, for Dick was coming for a holiday and the sailmaker had not put anything into the grommets. It was then that I saw some ball/bungee in the boat that I use fasten whatever needs fastening to the benches. I decided there and then to put those in the sail as a temporary solution and apologise to Dick about it. The rest is history. 
 
The ball/bungees are never coming out of the sail again, they work and are short enough not to catch anything in their way. A perfect solution accidentally discovered. It happens a lot with great discoveries. Wasn't Sir Isaac Newton hit on the head by an apple?  The only thing I would change is to put in four, not three ball/bungees.  I am thinking of adding one near the tack as that is the place where the biggest lump of sail is. It is also the part that catches most of the wind. If it is tight, chances that the unused part unrolls due to the wind are minimal. 

 
COMPASS
A lot of people, particularly racers I think, will advocate a large front reading compass mounted on the mast.  This requires some kind of customized bracket.  The main problem I have with this is I think for some of my cruising this set up might get in the way. (Al's note: Amen to that!! At least once, in the first race of the 89 Worlds in 25 knots of breeze, I've had the jib sheet tangle around a mast-mounted compass. This was right after the start and we ended up hove to on port tack in front of several onrushing starboard boats. Never again!!!!!)  I've also seen Star boats with matching flush-deck, top reading compasses on each side deck.  These are guys with money to burn.  I once had a bulkhead mounted compass that was attached to the aft face of the forward deck.  I hated it because it was constantly in the way.  But it was a gift from someone.  Thankfully, one day it just died.
 
For cruising there are times when it is nice to have a top-reading compass mounted amidships.  It is easy and surprisingly accurate to take quick rough bearing on objects when doing navigation.  Also, when one is sailing in a relaxing position such as sitting on the floor, this compass placement works best.  I have an old 3" Plastimo top reading, tactical racing compass that mounts upon the thwart.  It is attached by bungee cords and can easily be removed.  It is a dream to sail by in rough or nasty conditions and I love it.  It has colored sectors that are divided by large numbers in addition to degrees.  The numbers are much easier to steer by.  In addition to a lubber line the plastic dome is marked off at the 45 deg. and 90 deg. points.  So if your heading is Red 2 but you are hiked way out to starboard, all you need to do is hold the 90 deg. line on Blue 2 and you are on course.  My back-up compass is a 3" surface mounted, front reading Ritchie that is mounted on deck next to the mast (see photo below).  On many occasions when I am sitting out on the side deck, this is the more convenient compass to sail by.  The disadvantage is that it sometimes can be a catching point for the jib sheet.  A lower profile flush mounted compass would probably have worked better.


DICK

Ton Jaspers: This coming winter, I am going to make a compass house that fits in the V of the splashboards. The roof of the house will guide the sheets over the compass. On my old boat, I had a half sphere compass there and it is a perfect location. I did not particularly like the half sphere compass, hence I now have a racing compass with all the colours that Dick describes. The compass house is an idea from Poul Ammentorp - see photo below.


Above is a picture of a Silva 85 (my old compass). This is an example of a modern half sphere compass. It does not need a hole in the deck. You just screw it on top of the deck. My favourite position was in the V of the splashboards, in front of the mast. There, it is also far enough away from the VHF/ GPS that has a place in front of my mast. Somehow the compass wasn't affected by the speaker of the (portable) VHF/GPS. The 45 degree lubber lines made it easy to read from the gunwale, even when hiked out. Though the Silva 85 navigated me safely for many miles, I now have a Silva 103PE which reads more easily. To get it into the V of the splashboards again, I intend to create a small wooden compass house (use brass screws!!!).
  
Best wishes,

Ton


-----Original Message-----
From: Tom Graefe
Sent: woensdag 25 april 2007 23:14
To: Wayfarer

My only observation about the style of compass pictured, and Ton may be able to clarify as he used it for a long time, is that it does not seem to have a dial that can be read easily head on... the point being that compass style and placement work together, as each discussion has highlighted, and should complement your preferences for how you like to helm.

Tom 
 
Correct, but you don't read it head on. Most of the time you use the 45 degree lubber lines instead. When it is in the V of the splashboards, you can't read it head on , the mast is in the line of sight, but you can  read it at a slight angle. The reason I like my new one better is the bigger dial, specially the side (the 85 does not have a side dial). The colours are very helpful as Dick described. Amongst other things, they also make it easy to recognise a slow header or a slow lift. (The quick ones, you recognise by the seat of your pants).  
 
I never read a compass accurately; it is impossible on a dinghy anyway. Even on a big yacht, it is impossible to steer within a compass range of less then five degrees. On a Wayfarer, the compass swings around even more. You always have to guess the average course sailed. What I do is look for the maximum and minimum, the average course sailed being the calculated guessed as the middle between those two. The Silva 85 is reasonably accurate because the lubber lines are on the opposite side of the sphere and the sphere doubles as a magnifying glass. Because of that the dial looks as if it is tilted from a distance. That is what makes it readable in a horizontal plane.
 
Though the Silva 103 is much easier to read, I would recommend the Silva 85 to anyone on a low budget, it is very affordable.
 
Cheers,

Ton


----- Original Message -----
From: Tom Graefe
To: Richard Harrington ; richard watterson
Cc: Al Schonborn ; Wayfarer ; KEN/K.H.Jensen
Sent: Wednesday, April 25, 2007 4:25 PM

Hi all,

Good discussions.  I think Dick covered reefing in detail.  I find it useful to heave to, especially when solo, so I can get everything sorted out and stable, but have also done it with jib carrying along.  My rigging is similar but not identical to Dick's.  The main thing I did was what you've been doing:  practice until the drill is second nature--even if it seems funny to be practicing on a perfectly easy sailing day. 
 
One more note--I switched to single bungee and ball in each grommet model last summer because I got tired of the long lengths  of bungee (previous system) snagging on main cleat among other things.  So I now have bungee with ball on one end and clip on the other and just bring it around the boom and attach clip inside ball on other side.  I think Ralph R. suggested it to me at Cedar Point.
 
Regarding compass(es). I have a Ritchie F83W that is flush mounted to the right side of my mast .  It is visible from both sides of the boat when sitting on deck (I don't have rear seats in) or hiked out.  I like the flush mount as it stays out of the way of lines, as Dick noted.  If you flush mount the compass you need to fashion a leveling ring (photo below, under the sandals), which is only a minor hassle, and you need to cut a hole in the deck, which, early on in owning my W, I was reluctant to do.  I've attached a pic (not the best one, but the only one I have handy) that shows about where it is located.


For cruising I also use a second compass--a Ritchie kayak compass that attaches to the thwart with bungees--rather like a smaller version of the idea Dick uses.  This is mainly a back-up, but can be handy for easier viewing when sitting on the deck lazing along in light winds.
 
Dick highlights a couple of key points: visibility from wherever you are sitting, and ease of navigating when viewing from different angles. 
 
Tom
...
Subject: lest we forget - Ken Jensen's plug and routine for roller reefing
----- Original Message -----
From: KEN/K.H.Jensen
To: Richard Harrington ; Al Schonborn ; Wayfarer ; richard watterson
Cc: Tom Graefe ;
Sent: Saturday, April 28, 2007 11:14 AM
Subject: Reef + nearly *choke* !

Gentlemen,  (do not think you can avoid this!)
 
Here comes the nostalgic part that still works wonders (in less than 2 min. and with no bungees needed!)
 
The WAYFARER is like a small Viking ship (with an outboard as extra!). Oars are considered by me to be very important. Not shorter than 8 feet, they are marvellous for rowing, punting, sculling and as an emergency rudder, as well as for steering in very shallow water (if you are not alone, someone else may punt - or you do it yourself, in between, with the free oar because the steering one has been tied down).  Getting rid of sea weeds clinging to the rudder blade, I / we normally use a handy, always readily available (repeat always!), paddle for that or other immediate demands.  The oars are stowed port and starboard along the CB-casing on the floorboards, blades forward (under my 'king post' or tied together in front of and aft of the CB-casing  using two short lines with quick release knots, and thus I am able to free one/two oar(s), pull them up/out/aft in a matter of seconds. 
 
To help celebrate 50 years. of the WAYFARER next year (and this 2007 season, my 41 years. on W1348), I will recall for you, the original way of reefing, namely Roller Reefing (which is *my way* and I am not opposed to slab reefing,  but please remember: I have kept my boom-end sheeting since 1966, and therefore I'm able to roller reef and to have my gimballed SILVA compass (number 3 hereof in use, having a steering grid and fluorescent points for night sailing - after aligning the grid) mounted aft of the main thwart on the slanted part of the CB casing).
 
After hoisting and cleating the mainsail, I make the free length of the main halliard (outside the mast - after the sheave at the lower part of the mast and the cleat on the mast) into a halliard-rope bundle, which when freed from the cleat, but remaining coiled, allows me roller-reefing to the lowest batten.
 
BUT check this step by step, please (if interested): 
  1. free/remove the tack pin of the mainsail, and pull the mainsail foot rope as far out as possible along the boom with the outhaul (to avoid a drooping boom!).
  2. if your mainsail has a 'mini'/flat-reef eye (efficient on the wind before possibly reefing!) in the leech (about 22 cm vertical up to the centre from the boom) pull that to flatten the mainsail.
  3. the outhaul lines for the mainsail's foot, and possibly the flat reef are cleated (separate cleats near the position of the boom fitting for the kicking strap) on the side of the boom.
  4. one of these lines, for me the outhaul line,  is left hanging into the cockpit (if it is not long enough  - it ought to be! - extend it, so the loose end does not disappear into the sail as you roll!), and bring the forward boom-end forward onto the windward side of the mast while rolling the boom (the very first act: heave to, stabilize position, remove/furl the foresail(Al's note: with due respect, my understanding of heaving to is that the jib/genoa has to be involved - my assumption is that here, Ken is talking about letting the main luff and the boat stop - at which point I would also raise the board completely to be on the safe side.)
  5. then, after roller reefing is performed,  you attach/tie the down-hanging outhaul line to the kicking strap, thus creating a boom stabilizer - it is not a proper kicker! (I am not talking racing - just efficient and easy handling, and that must be practised in order to get the dancing steps right! No hurricane needed for such practice!).
  6. when the sail has been rolled, hoisted, halliard cleated and with the boom now being higher than the ordinary position for the goose-neck (gives more head-room, less chance for the boom to catch the water in heavy gusts) place the boom on the goose-neck, stretch the luff/leading edge of the mainsail with the Cunningham tackle (which at the same time may be attached so as to 'de-twist' the boom - vital for old wooden boom goosenecks), then screw fasten the gooseneck, this is if you are one of the lucky ones who still has a sliding one!  If you are not that lucky, you´ll have to lean/'hang' heavily on/press/weigh down your boom to stretch the leading edge of the mainsail and to get the boom onto the goose-neck, and then perhaps attach the Cunningham tackle to do the de-twist.  
    The whole operation is done in the stable hove-to position, standing to windward by the mast, boom eased out at 45°. with a fluttering mainsail, and it works even in a high wind and rough sea way - then max half CB to get/create 'square' (breaker-yielding) drift, thereby creating the 'slick' which reduces on-coming breakers' steepness - depending on kind though!  (Al's note: Trying to teach an old dog new tricks Department: Ken, wouldn't the following order be better for item #6?  boom onto gooseneck > tighten main halyard to remove unwanted slack and get cunningham effect > put on enough cunningham to de-twist the boom)
  7. if more roller-reefing is necessary, the lower batten must be removed, but this can be tricky when solo sailing and being seaborne in a sea way ! Then I choose, for solo sailing to pack up + tie down my mainsail, and to use my W-trysail (carried 'at ready') perhaps with added W-genoa or W-jib as may fit the condition. 
Much more important though is to read R.H. Dana's Two Years Before the Mast (incl. last short chapter 'Twenty Four Years After' www.narrativepress.com) which has given me wonderful sailing reading pleasure. But then I am old, and privileged to have sailed a square rigger for five days on the North Sea which gave me a better knowledge of square-rigger handling!  (Al's note: I have had this book sitting on my shelves for 30 years, and now you have made me decide to read it at last! The last chapter in my edition is simply called Concluding Chapter.)
 
Remaining very respectfully and truly yours 

Ken W1348 "Maitken"
 
......
Subject: Uncle Al responds further to Ken's e-mail above with fresh thoughts on heaving to, etc.
----- Original Message -----
To: KEN/K.H.Jensen
Cc: Richard C Harrington ; wayfarer@home.nl ; richard watterson ; Tom W9668 Graefe
Sent: Tuesday, May 01, 2007 10:29 PM

Hi, Ken:
 
With all the colours we are using up, I will stay with my favourite ... green but this time my second set of replies will be in bold style. 
 
Best regards,
 
Uncle Al (W3854)


----- Original Message -----
From: KEN/K.H.Jensen
Cc: Richard C Harrington ; Ton Jaspers ; richard watterson ; Tom W9668 Graefe
Sent: Monday, April 30, 2007 10:58 AM

Hi Al,

Always a pleasure to visitYour WAYFARER Domain  and it looks very good indeed with good sensible adjustments.
 
# 4. The action of 'heaving to', is for me the following:  Heading into the wind to stop all forward movement. When full STOP with all sheets fully eased, sails wildly fluttering, bow ~45° off towards down-wind, tiller full down a-lee, tiller-ext.  also swung out, so with the lee-heeling of the boat it will remain there at least for some 30-40 seconds, while I move forward to lift the CB( so far I have not tried in real high wind+rough sea your recommendation of CB full UP !)  as I pass by to quickly furl the foresail.  This action is made as in one 'sweeping' movement from the decision is made, and it is what I mean by: heave to, stabilize position, remove/furl the foresail  - ready for reefing!
The position you describe - for me 90° to the wind, no forward momentum, sails luffing completely and no board down - has no English name that I am aware off, so I have called it the rest and relaxation position - for details, click here. I have found it particularly "life saving" in wild conditions. Since I know you enjoy telling and hearing stories, I will give you the short version of three times when using "board full up" trick has really made life a lot easier for us. I think that many of us are afraid of having the board full up from the rolling motion this permits/promotes on a speedy run, but once the boat is no longer moving forward, such rolling is longer a concern - the point being that rolling from side to side on a run at high speed is suicide because if your bow ever digs in, your boat will do a very fast 90° turn and roll over (to leeward, if you're lucky, or to windward for the dreaded "death roll" and the immediate "greenlander" as the Danes so colourfully call it, because the main is out for a run and offers no resistance to "turtling" as we call it here). No amount of steering will avoid this: at hull speed or more, the W is simply too heavy for its rudder. But with no forward motion, everything is different. And this brings me back to my three stories:

1. Hayling Island, 1992 Worlds, winds F7, 28 of 52 boats capsized, one of which was Frank (Wayfarer Man) and I. A sizeable number of boats did not manage to self-rescue in the considerable wave action, and had to be towed in. When we capsized - a warm day with warm water, lucky us - we righted but almost immediately capsized again when a gust caught the mainsail, pushed us forward and slowly but very surely rolled the boat over despite my best efforts to gently luff up. Then I remembered the board! This time, the first thing I did as I fell into the boat as she righted (sideways to the wind, mast pointing downwind), was to jam the board full up - and then I had time to to untangle our sheets. As long as we heeled to leeward slightly, there was no danger of the boat gathering forward momentum, and I was also able to leave the tiller since the boat was drifting downwind at right angles to it, and the rate of drift was keeping the rudder in the "trying to luff up" position. While Frank bailed and I cleaned up various lines and the floorboards, we noticed another bonus from having the board full up: in that position, the board blocks most of the water that would otherwise come into the boat through the CB box almost as fast as we (Frank, actually) could bail it out. We soon had the water low enough to sail the rest out with the bailers open on reaches. I can't recall if we finished the race - I think we did because I remember us going up the final beat and meeting Mike McNamara who had won the race and was running back towards Chichester Harbour and the bar at Hayling. I remember thinking that even Mike and his crew were looking pretty wet with their hair pasted all over their faces, unlike their usual shipshape selves.

2. Late 1990's, the end of an Around-Toronto-Island Race in which I was steering my Irish pal, Tom Wharton's W600. We were sailing on a very broad reach and nearing the finish line off Toronto Sailing & Canoe Club in a wind that had suddenly come up to about 25 knots (12 m/sec?). The wave action was pretty wild as we angled closer to the breakwater which was bouncing the waves back at us, but in a moment of madness, we decided we needed the spinnaker since it was very close between us and the second-place boat. It was a wild ride. Sitting on the aft tank, I couldn't even see the bow what with all the spray flying. Still, eveything was fine for a minute or two - until Tom's (unfibreglassed!) rudder blade snapped off. "Spinnaker down!" I screamed at Tom while I dove to raise the board which had been half down for stability. Tom did a great job collapsing and downing the spi almost instantly. He was a bit excited, however, by the fact that we were only about 200 m. off the wall with the wind angling at about 45° to push us slowly closer to it. In his rush to break out the paddle from its storage bracket, he snapped it off. We then tried sailing with a bit of board and luffing the main when we started pointing too high, but this became somewhat hair-raising and we pulled the board full up once more and downed the main. It would, after all, be a broad reach to the finish line, so that jib (genoa) alone would serve nicely. So we were a pretty funny sight, I'm sure, as we limped across the line in 9th place, with Tom playing the jib and yelling "up!" or "down!" above the whistling of the wind while I hung acros the aft tank on my stomach and steered with what was left of the paddle's blade. One of my best bits of seamanship ever, and largely due to knowing enough to get the board full up right away!

3. A couple of years later, at our Nationals off TS&CC, I was sailing with my son, David (12 or 13, 40 kg.) who is a great crew but did not know how to get the main down (several things, e.g. vang, outhaul have to be released first before the wire will come off its rack). Anyway, it was 10 a.m. and we were about to have Sunday's first race when the RC fired the three guns for abandonment. I looked up, and there, in the NW, was a black squall cloud with the white wind bits in front of it. I was stunned, having never before seen a morning squall. I thought we might make back to the safety of shore, about a km. away, before it hit. Bad decision! I should have taken what time was left to get the sails down!! Instead, we got hit by winds gusting to 50 knots. I immediately had Dave let go the jib and ragged the main but could feel the wind getting under the hull and the boat beginning to slowly capsize, someting that had happened to Julia and me several times before. Luckily, I remembered: "Board up!!!!!" I conquered my hiking instincts (futile, as I knew from past experiences), ducked into the boat and whipped the board full up. Now the boat stabilized at an angle of heel that just left the leeward deck mostly clear of the water, even when I went inboard to lower the jib (which came down with such force that I later - at home on the front lawn - had to dismantle the halyard block arrangement to free the swaging/tellurit from where it had become wedged between the side-pieces of that double block that lets the jib halyard enter the old-style mast, so badly that a hammer and screwdriver would not free it!) and then the main came down pretty easily. Once that was stowed out of the worst of the wind, we could sail under mast alone and stay away from other drifting "wreckage". All the other Wayfarers still out there had capsized, and we did in fact make it to that evening's Canada national news - prompting a laughing phone call from Wayfarer Man in Ottawa.

So, Ken, this is why I love having the "board full up" position as a bit of very useful knowledge that, as far as I know, you don't find in books! What I did however, find in books - the Glénans Sailing Manual to be precise - was heaving to, as you can see from the scan below:


For Wayfarers, I have refined the Glénans suggestion as follows:

1. I always put on a fair bit of vang/kicker because this not only keeps the main from flogging and wearing out the leech (lots of money in those racing sails!) but is also much quieter and soothing to the mind. I then bring the main in far enough (about half way or more) to keep the boat at a fairly steady angle to the wind (too far out and the backed jib will make us bear away before the main finally kicks in and makes us luff up again).

2. As long as I am not afraid of hitting a lee shore, I bring the board full up which gives us a buffer against nasty gusts which we get a lot near cliffs or in the shifty winds of small lakes. Bringing the board full up has the further excellent benefit of making us drift straight downwind (but sideways to it) at some speed and automatically keeps the tiller to leeward. Fixing it in place there with a bungee cord or whatever, is still useful (though not essential) since the wave and gust action tends to slam the rudder and tiller into their extreme positions on a regular basis, something that can't be good for rudder, tiller and their fittings. I often "fix" the worst of this problem by sitting to leeward in the "corner" between the side deck and the aft bulkhead with the tiller behind my back.
 
Now - talking solo-sailing - I can move back to secure the tiller full a-lee (forced to bring my 'gaining' weight 'down there'!).  However starting last year when solo-sailing (and always while fishing) I make my steering-line available, meaning able to steer from any position in the cockpit, and possibly if wanting to reef (or other necessity e.g. beer-'diving' down below floorboards, maybe to forestall the disaster of leaking beer cans!) steer from a sitting position to windward into *hove to* as mentioned above, and then cleat the steering line to hold the tiller full alee!
Sounds like a fine system - on a cruising boat! It might get in the way when I'm racing though. In any case, with my system, especially the R&R position, I can ignore the tiller once the forward momentum is gone, and rummage under the floorboards, etc. for minutes on end, or, God forbid!! even longer until I find my beer and stop the leak with my mouth. And the beauty is that once the board is full up and the boat has stopped moving forward, you can go to leeward all you want, just as though you were at the dock with the sails down!
 
Yes, my friend # 6. ought to be clarified:
 
# 6. as the sail has been rolled, hoisted, halliard cleated and with the boom now being higher than the ordinary position for the goose-neck(gives more head-room, less chance for the boom to catch the water in heavy gusts) place the boom on the goose-neck, stretch the luff/leading edge of the mainsail with the Cunningham tackle (which at the same time may be attached so as to 'de-twist' the boom - vital for old wooden boom goosenecks), then screw fasten the gooseneck, this is if you are one of the lucky ones who still has a sliding one!  If you are not that lucky, you´ll have to lean/'hang' heavily on/press/weigh down your boom to stretch the leading edge of the mainsail and to get the boom onto the goose-neck, and then evt. attach the Cunningham-tackle to do the de-twist.  
The whole operation is done in the stable hove-to position, standing to windward by the mast, boom eased out at 45°. with a fluttering mainsail, and it works even in a high wind and rough sea way - then max half CB to get/create 'square' (breaker-yielding) drift, thereby creating the 'slick' which reduces on-coming breakers' steepness - depending on kind though!  (Al's note: Trying to teach an old dog new tricks Department: Ken, wouldn't the following order be better for item #6?  boom onto gooseneck > tighten main halyard to remove unwanted slack and get cunningham effect > put on enough cunningham to de-twist the boom) 
I think this will work even better with the board full up. I should imagine that even if a breaker hit you sideways on, it will be better to have the boat in a position where it will slide sideways more easily with the wave?
 
Re: Al's note: Very good suggestion, Al, but from experience (and accepting the grand total *All up [or down(!)]  Beer-wt.* of some of us) I know, if about 60% of this body-weight is applied hanging on the boom in order to stretch the leading edge of the mainsail you'll get a far better stretch than can be achieved by hand-pulling the halyard - but of course a matter of choice!  The sliding goose-neck is a great advantage as strechting and de-twisting is done in one process by the 4-part Cunningham  tackle.
I know what you mean, Ken! We always hoist and cleat the main first and then pull down (a little) to plug the boom into our now fixed gooseneck (new mast) - though even on the old mast, we tightened the adjustable gooseneck's screw so much that it was to all intents and purposes, fixed. This was done because we found that our 42:1 vang/kicker kept pulling the gooseneck (and boom) below the "black band" unless I used pliers to tighten the gooseneck wing nut as much my strength allowed. I didn't know how many such tightenings the screw would accept before it broke, so in the end we just left the gooseneck fixed and made the boom come to the gooseneck.
 
This I mailed seperately to Rich. Watterson - (inviting his 'delete'-button) - and naturally forgot something important! 
Under a reefed mainsail alone (if no standing furled foresail, move the foresail halliard to the bow fitting as forestay back-up!) for windy conditions (sail flattened, all strings pulled/set hard) in a seaway, move the traveller out (*my way* ref. FINN- and OK-dinghy style) and before coming about, ease off a little to gain speed and then sheet in as you tack into the waves and wind. When the bow is passing the "wind´s eye", as you move yourself to windward, relax and ease the sheet some (low speed = powerful across-ship component!), get settled on the windward side-deck, start sailing: playing the tiller - low speed calls for a definite pull to bear off - get `dancing´ with your boat (play sheet, balance and waves - head up into the oncoming wave, bear away as you cross the ridge and head up again a.s.o. sailing closehauled - moderate forward speed = less spray/sea breaking water!). Tacking as above gives less risk of "going into irons",  but if you happen to do just that, then ease the sheet, push the tiller down to lee, let the wind and waves back you/your W.(if rough conditions CB only about  60% down) around, rough tiller-handling, hard moves, pulling and jerking may help to get the wind-angle right, gradually moving the boat forward. The tiller and sheet should continously be adjusted/moved in-out, in-out, and the mast must point fairly upright towards Zenith - meaning your W. must be kept flat on the water - meaning no heeling! 
Heeling your W. is only used in very weak winds in order to give a gravity-caused 'curve'/camber in your sails and less friction area below the waterline.
I basically let the boat tell me when she's heeling too much: which she does by giving me more weather helm (tendency to luff into the wind) than I can easily handle: a touch of weather helm is good, but if you have to actively fight the tiller to keep the boat going straight, that is too much, both for your arm and shoulder as well as for the rudder and its fittings!
Regarding getting out of irons, as Ken says, let the main luff completely and push the tiller to one side until the boat backs around to a sideways to the wind position. (If the wind is not too wild, the handy method we learned at junior sailing in the 50's is "push the boom and the tiller out to the same side". This gets you going backwards faster and out of irons sooner. Just let go of the boom but not the tiller before things get too uncomfortable - remembering always to "duck your beanies, kiddies!!")
One mistake usually made by beginners getting out of irons is trying to start steering in the "forward mode" while the boat is still going backwards. Moving the tiller out of its corner and trying to bear away onto your new tack before the boat stops moving backwards just starts pointing you head to wind again and back into irons because you are still going backwards and the steering effect is reversed. I suspect that once the boat has backed around into a beam reach position, it might even help to briefly raise the board completely, and then, once everything is all set, you can lower the board (part way or all?) and slowly bring in the sail. Remember also that when going backwards, the back of your boat will turn in the direction the aft edge of your rudder blade is pointing. Which means that if you had a good reason to tack from say starboard to port tack, you can make sure that you end up getting out of irons onto port tack if you hold the tiller to starboard as you go backwards, and vice versa.
 
Well, gang, this was most certainly a fun way to spend my evening. Talk to you soon,
 
Uncle Al (W3854)
 
All the best to all of YOU and happy W-sailing !   Ken  
Subject: one last word on heaving to from Ken
----- Original Message -----
From: KEN-Krist. H. Jensen
Cc: Brandon US-W-sailor
Sent: Wednesday, February 25, 2009 3:04 AM
Subject: W-Reefing!

Hi Al !
 
.... thanks a lot and VERY nicely presented, Al ! 
 
Looking through "Roller Reefing" in the 5th item it looks as it should (bar one INFO-comment I have made below!) and you know that your well-tested, clever 'CB-fully' up has been accepted by me.
 
You, my good friend, write: (Al's note: with due respect, my understanding of heaving to is that the jib/genoa has to be involved - my assumption is that here, Ken is talking about letting the main luff and the boat stop - at which point I would also raise the board completely to be on the safe side.)  That is correct only because you write  my understanding of heaving to is that the jib/genoa has to be involved and ONLY because you write like that! 
 
Heaving to means stopping the sailing-vessel, any sailing vessel, under any kind of reduced sail(s) of a proper size and in a proper position to make the 'ship' (a friend wanted to park his car and W. in a parking lot in Munich and the P-guard said: "Das Auto geht gut aber das Schiff geht nicht!") have a chance to yield/give way to the onslaught of the seas through a "square-drift". Therefore, my good man, at Maritime Museums you'll see paintings of  square-riggers hove to under one or two lower topsails, where the windward half is tied up to the spar, and with NO fore-sails at all !  Or a three-masted schooner with a stay-sail between the main mast and the mizzen mast - and maybe a small jib!
 
My recommendation for the W. is: "Heave to - AND away with the foresail asap!"
 
It is a great delight for me to look through the W-material of your Domain!  All the v.best + kind regards.  Ken t.o.