| Desired
Result:
For the genoa, there are two basic aims: 1. to have a sail with an appropriately rounded entry for the conditions, which leads into a fair (even) curve ending with an unhooked leech. The tighter your jib halyard, the flatter your entry will be. There is a trade-off here: as the entry gets rounder, your steering groove becomes wider but you will point lower. Therefore it makes sense to sail with the flattest possible entry that will still let you stay in your steering groove with relative ease. The test here is that you tighten your jib halyard until both the windward and leeward tickers begin to indicate turbulence almost simultaneously as you sail close-hauled. At that point your groove is too narrow and you must loosen the jib halyard slightly. Overtightening the halyard has the same effect on the genoa as overbending the mast has on the main - the entry gets too flat! If in doubt, let it (the halyard) out! 2. to have a sail which sets at a more or less even angle to the wind up and down the entire sail. In difficult steering conditions, you will need to let the upper part twist off somewhat to leeward as twist also widens your steering groove. Lead
Position:
We have installed a second parallel track along the outside board but use this rarely and to no great discernible effect - in survival conditions + waves. 2. FORE/AFT: A good starting position for your lead is where the extension of a straight line from the mid-point of your jib luff through the middle of the clew cringle would meet your track. On SHADES, this position is about 3½” forward of the front edge of the centre thwart. the "you
won't find
this piece of wisdom anywhere else" department:
If the uppers show luffing before the lowers, you can/should sheet in more, and vice versa. If the tickers all start to show luff at the same time, then your sheet tension is perfect. The further aft you set your lead, the tighter you will need to sheet in to get the right balance. This in turn results in a flatter foot which is the same effect as tightening the main outhaul. Tickers: We have three sets of 4” (virgin) wool luff tickers at quarter, half, and three quarter height - just over 4” aft of the luff wire and away from as many seams as possible to reduce snagging. Again, we use a sailmaker’s needle to thread each ticker through the cloth. We keep them centred with an overhand knot (half a reef knot!) close to each side of the cloth. We also have a leech ticker at about 3/4 height (but away from the spreaders!) that gives an even more sensitive sheet tension reading than comparing the upper and lower luff tickers. As with the main leech ticker, we sheet in until the leech ticker starts to get sucked behind the sail. NOTE: With the main, we often oversheet past the optimal position indicated by a leech ticker that is beginning to show stall, once we're up to speed. But this should never be done with the jib! Jib Cunningham:
 ... ... Upwind, we tighten the cunningham enough to stretch our (shrunken, 5-years old) luff tape a bit but stop short of stretching the actual sailcloth in the luff unless the wind really comes up and we need to move the draft forward. NOTE: If your jib is fastened to the luff wire at both ends, you need to make sure that your luff is not automatically given a cunningham effect as you tighten the halyard (and thus, the jib luff wire) - i.e. if your sail cloth has shrunk, then the cloth will stretch it as the wire comes under tension and you will have a vertical cloth wrinkle just aft of your luff wire! This is horribly slow - especially in light airs!!! Jib Sheet:
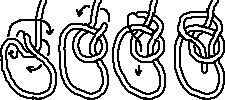
A reasonable alternative if your jib clew grommet is big enough to accommodate both ends of the jib sheet, is to stick these ends through the grommet in opposite directions and then put Figure Eight stopper knots in both loose ends. In our discussion, the problem raised about using bowlines was that they can catch on cleats on the side of the mast (those that still have the old cleats where you have to wind the halyard tail around a couple of times and then fix with a hitch). And the Figure Eight system was rightly criticized as having an odd-angled pull on the clew and its grommet. Joe Davis of Belwood Lake SC near Guelph, Ontario, then suggested a method that gives the best of both worlds: Use the old, non-continuous sheet method (fold sheet in half, push about 6" of the resulting loop through the grommet, feed the two loose ends through the loop and pull good and tight
..... |