|
Navigation Chart Reading. Nautical charts are wonderful. They convey a wealth of information, and are much more interesting than road maps. It is not difficult to teach yourself to read a chart, but many people like to take a Power Squadron course, or read a book on piloting. When you are using the chart on a cruise, you should look at every little detail, every letter, every number and line that is printed along the course you are cruising. The abbreviations are all listed in "Chart No. 1" published by the Canadian Hydrographic Service, Department of the Environment, Ottawa. Get this useful booklet (it is not a chart at all) many months before you cruise, and browse through it with one or two charts in front of you. A lot of the abbreviations have two or more meanings and have to be taken in context. Most of the complexity of chart theory is due to the curvature of the earth's surface and can be entirely ignored for dinghy cruising over distances of a few score of miles. Charts can therefore be regarded in practice as ordinary maps of a flat surface, with north to the top, east to the right, all angles correct and the scale the same all over. You do not need to know whether your chart is a mercator's projection, polyconic, or any other. The longitude lines run exactly north and south; the latitude lines run exactly east and west. The scale is marked on the chart, but it is easiest to work in nautical miles. One nautical mile is approximately 1 and 1/7 land miles, and is exactly 1/60 of the distance between two latitude lines which are 1° apart. The latitude scale is marked at the side of the chart, and the latitude lines are usually drawn at intervals of 10 minutes, 20 minutes, or 30 minutes. You can quickly see which of the little hatched spaces at the side of the chart represents one nautical mile. i.e. one minute of latitude. Never use the scales at the top and bottom of the chart as these are longitude and their relative distance changes with distance from the Equator. Depths may be measured in feet or fathoms, or on some of the new Canadian charts, in metres! The printing style is slightly different for each of the three, and the unit is always stated on the chart right under the title that tells you the area covered. Always be sure in what units the depth soundings are recorded on the chart you are using. It makes a lot of difference. Compass. A compass is the most important instrument to have on board and is even more important than the chart. I like to have two compasses, one mounted in the boat, and the other a hand-bearing. You can get a boat compass which can be lifted out and used as a hand-bearing but the instrument is so important that it is wise to have two so that one can be used to double check the other. There are many kinds of hand-bearing compasses. I use one made by Silva, which lies flat against my chest on a lanyard, and has a mirror which can be used in shaving or applying makeup and, I suppose, could also be used for signaling in sunshine. The compass card can be set off to correct for magnetic variation, and thus give true bearings directly. This is very useful if your practice is to plot true bearings rather than magnetic ones on the chart. Then you have only to remember to use the variation when using the boat's compass. If your practice is to use magnetic courses and bearings on the chart, then set the correction to zero and leave the hand bearing compass to read magnetic. Choosing where to mount a dinghy compass is difficult. Cruising practice is to have the compass three feet from any iron or steel that might cause magnetic deviation. In a dinghy, this is almost impossible. The articles that have to be kept away from it include the following: anchors, tool roll, stove, canned food. utensils, flashlight (battery casing is often steel), spare batteries, camera (especially the light meter), A wooden or fiberglass bulkhead between gives no protection. Your own pocket knife or steel watch band will also deflect the compass if it comes too near. After many trials, we now mount the boat compass on the mast, just below the lowest position of the gooseneck. This is stainless steel and almost non-magnetic. The mast track is aluminum and all screws are either stainless or non-magnetic. The problem with this position is that the compass is far from the helm, but we find it better to have to lean forward to see it, than to have it close, but undependable. There
are two factors for which
correction
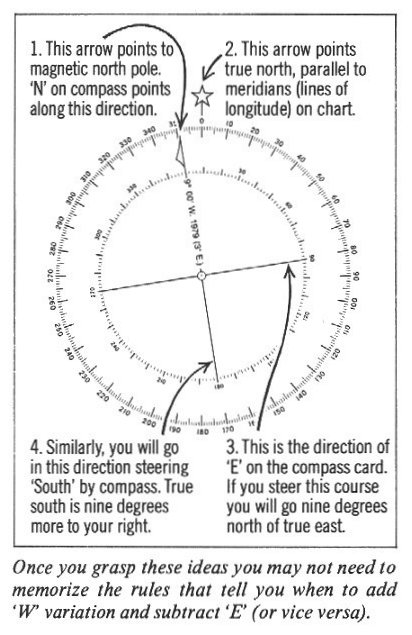
must be made: "variation" and "deviation". "Variation" is no problem if
you remember it—the north magnetic pole is not at the north pole itself
but somewhere in the Canadian Arctic (Prince of Wales Island). The
compass
needle points to the magnetic pole, and therefore, over most of the
Great
Lakes, points a few degrees west of true north. The variation is
clearly
marked on the compass rose of the chart, and over the distance you will
cruise in a dinghy it will be same, within a degree, for your whole
vacation. .
 "Deviation"
is another matter entirely.
It
is the compass error caused by nearby iron and electric currents. On a
large boat, provided movable magnetic objects are kept away from the
compass,
deviation can be corrected by special magnets, and a deviation card
prepared
for the remaining error. It is not constant like "variation" but varies
with the boat's heading. In an empty dinghy built of wood or
fiberglass,
with wood or aluminum spars, the deviation is nearly zero. But once you
load a dinghy with cruising and camping gear, there can be a large
deviation
that varies not only with the boat's heading but with exactly where
everything
is stowed, and thus may change from day to day. Also, you cannot keep
all
movable things more than three feet from a dinghy compass. The only
solution
is to keep magnetic things as far from the compass as possible and
always
be aware that there may be an error. Check from time to time with the
hand
bearing compass, and remember your pocket knife or watchband and even
your
eyeglasses, may affect this reading too.
Given all these problems, and the way a dinghy yaws with the waves, you will do well if you can steer within 5° of your course at any one time. With care, you should be able to average rather better than this during an hour's run on a constant course. An error of 5° gives you a one-mile error in your landfall after a crossing of 11 miles. This is not bad when visibility is adequate and you can pick up your objective from a few miles out. Instruments. To use a chart for navigation, the necessary instruments are a pencil and a parallel rule. You do not really need dividers, which are used in accurate navigation for measuring distances. For dinghy navigation, because there are other, larger, sources of error, a thumb nail on your pencil or straight edge is good enough. Parallel rules are not easy to use in a bouncing dinghy. We prefer a "course plotter" which is a tough transparent plastic ruler four inches wide by fifteen inches long, marked with a series of parallel lines and with a protractor centred at the middle of one side. We thus have a protractor and parallel rule in one instrument and can lay off courses and bearings either from the compass rose if it happens to be handy, of from any line of longitude or latitude using the protractor. Such devices can be found in marine stores; I prefer the simplest type, with no moving parts. Piloting. It is a good idea to take a Power Squadron course in piloting. A few points relevant to dinghy piloting will be mentioned here. First, fold your charts. It is hardly possible to control rolled charts, or to use them opened out on the centre thwart of a dinghy. Keep either to nautical miles or land miles. We always use nautical miles for the convenience of using latitude as a scale of distance. It is also good practice to stick to either true compass bearings or magnetic compass bearings, for plotting on the chart. It is strictly correct to use only "true" on the chart, but whether you use true or magnetic, it is a mistake to mix them. Piloting, as taught, makes use of the speed of the boat for dead reckoning positions, expected time of arrival, etc. Speed is difficult to predict in a sailboat, but it is useful to know your average speed over the past hour. With practice you can guess it fairly accurately, but you need to have a method of measuring if you are going to practice judging it effectively. This can be done with the use of a float at the end of a piece of light line of known length (we use a pierced tennis ball). The length of the line is decided as follows: determine a period of time for which it will be easy to keep a constant course and speed, such as twenty seconds. The length of the line is then the distance that the boat will travel in twenty seconds at a speed of one nautical mile per hour (1 knot), which is thirty-four feet. The free end of the line is looped to slip over the crew's wrist. The crew fakes out the line on the side deck and, holding the float close to the water, drops it when the helmsman reaches zero in a countdown or starts a stop-watch. The crew calls "stop" when the line tugs his wrist. The speed in knots is then equal to twenty divided by the number of seconds it took for the thirty-four feet of line to run out. If you work in land miles, use a string twenty-nine feet long, and the speed is in m.p.h. The time can be estimated to about half-a-second with care, and at four or five knots, calculated speed is accurate to ten percent. Many navigational errors can be avoided, particularly when sailing parallel to a coastline, if Expected Times of Arrival are regularly worked out and the actual time of arrival off each headland or feature on a coast is checked against the ETA. If the actual time of arrival is much different from expected, the likeliest error is that some feature that is quite inconspicuous on the chart (such as a small head-land) is being mistaken for the feature you thought you had reached. This can happen easily, even in good visibility. In poor visibility, ETA's are invaluable both for coastal and for open water courses. Write freely on the chart in soft pencil. It can easily be rubbed out later. A hard pencil might tear a damp paper. Charts should be kept in a transparent plastic case so that they can be read without exposing them to spray. Some people use a tight-fitting plastic cover and plot courses on it with a grease pencil. Either way, it is best to mark a series of positions on the chart and the time you were there. Then, if you need to know where you are because of a change of weather or visibility, you can find out quite easily from your last known position. Plot fixes for practice frequently, and compare them to your dead reckoning position. The hand bearing compass gives you bearings on ends of islands, water towers or other landmarks ashore. Make use of "ranges" as lines of position when two objects such as the left hand end of one island and the right hand end of another come into line. The more often you do this when conditions are good, the less likely you are to be lost when conditions become difficult. Piloting a dinghy on a constant course off the wind is fairly easy. You must be aware of leeway due to wind and sometimes drift due to a current which you may not have expected. After leaving your point of departure, look back and check several times in the first half hour to see whether the point of departure is exactly over the stern when your heading is correct. If it is to one side or the other, you are not making good the course you thought you were. Usually the point of departure will appear somewhat to windward, and the angle it is off gives you an estimate of your leeway. You can start to correct for it right away. True leeway is usually negligible in a dinghy on a beam reach or better. However, if the wind has been in one direction for many hours, there may be a surface current on the water which gives the same effect. Naturally there are currents to be aware of at the major rivers entering or leaving the Great Lakes. There are often counter-currents along the shore over many miles, as along the south shore of Lake Ontario. There are no true tides on the Great Lakes, but the "seiche" can cause big movements of water due to wind and barometric pressure changes, and this results in significant currents, particularly at a narrow junction of two wider bodies of water. When
hard on the wind, piloting is
much more
difficult. Allow 5° for leeway, or more if there are big waves. The
problem is that you cannot keep a constant heading. The wind is usually
shifting through at least 5° and often much more, and it is not
realistic
to hold your course rigidly when you can easily head up. Get in the
habit
of averaging your compass course, and tack at fixed intervals, making
no
more than two tacks every half-hour. The table shown gives the time to
spend on each tack for different courses to windward relative to the
average
wind direction. ..
 I
have allowed for 5° of leeway in
calculating
these times. If you do not arrive at the expected spot, the likeliest
assumption
is that you have made more leeway, and you should look for your
landfall
further to windward (and a little towards the direction of the less
favoured
tack). However, when your course lies to windward, it is wise not to
rely
on making an exact landfall. It is better to aim for a conspicuous
object
on the safe side of your destination, and proceed from there.
|